Interview with Zero Compromise Optics

Interview with Nick Gebhardt, Marketing and Social Media for ZCO Optics

How did you get your start in the industry?

I linked up with Jeff Huber (owner of Zero Compromise Optics) back in 2014. Back then I was, on my own time, doing rifle scope and binocular reviews that were getting posted to an online magazine. I believed the content I was seeing on optics reviews could have been better so I was doing my version of what I thought “better” could be. So I reached out to my contact at Kahles in the United States letting them know that I was doing some reviews and would they like some additional exposure. Not too long after that Jeff got ahold of me and asked if I would do a binocular review for Kahles. I agreed and he sent me a demo pair of the Kahles 10×42 binoculars for review. I took my time putting together a review and when I contacted Jeff to return the binoculars, he mentioned that he could use some extra help. I asked what I could do and after meeting with him in Orofino, Idaho, he brought me on to help expand the Kahles network throughout the United States. That was right in that time frame when, if you were part of the industry, you noticed the rise of the Kahles brand in the precision shooting community. A lot of that was due to what Jeff and I were doing. I was traveling around to shooting competitions trying to get Kahles optics out there and that was how I got my start in the precision rifle industry. 

How did Zero Compromise Optics come to be?

Roughly three years later, Jeff and I left Kahles and took that opportunity to start with a clean slate and build what we thought was the ultimate rifle scope. My background in the competition/end-user standpoint combined with Jeff’s decades of experience building high-end precision rifle scopes, along with some other partners including the owner of a high-end machine shop and a talented optics engineer formed the initial team. This team’s dedication to creating the highest-end rifle scopes was the start of Zero Compromise Optics.

What type of shooter should move up from less-costly scopes to a ZCO scope? What are some of the benefits?

That is a tough question and really it comes down to their personal preferences. Can they identify something that is missing in what they are currently using or have tried and does ZCO fill that need? We are at the very high end of pricing and we understand that because we don’t want to be a mid-pack rifle scope company, we want to be at the very high end. 

So you have hunters out there that spend thousands of dollars for a guided hunt in the United States or somewhere in the world, they have rifles that are extremely expensive that they take on these hunts and that is something they shouldn’t want to chance on a cheap optic on top of their rifle. A lot of those types of hunters tend to graduate towards our  4×20 optic. It is a short, fairly compact, high-performance rifle scope that many feel doesn’t give up anything to the 5×27 except for that extra bit of magnification at the higher end. So they really appreciate the 4×20 scope for its size and capabilities, the light transmission, the ease of getting behind the optic especially when in a rush and getting that full sight picture and being comfortable behind the optic. Those are the type of shooters I’d suggest take a look at our scopes for the experience and capabilities they might not know they are missing until they try one. 

Other shooters that might want to look at ZCO scopes are precision rifle competitors whether that be PRS, NRL Hunter, team matches, and other matches not affiliated with the large organizations. There are a lot of optics companies out there that do a fantastic job and offer great products but we feel that ours offer the best combination of features that shooters are looking for as well as the best optic performance in the industry. Any shooter looking for that extra tiny bit of an edge that might get them a couple of extra points in a match, those are the shooters that might want to take a look at our products and what we offer. Especially when those shooters are spending a lot of money to fly across the country to compete in a match and have invested large amounts of money in their rifle and ammunition, they want to leave as little to chance as possible. We believe we provide the rifle scopes that will give that little bit of an edge whether that is the ease and comfort of getting behind the scope quickly, getting that full sight picture, the feel of the controls, mechanical durability, and robustness of the scope, all of those things come into play. Of course reticle selection is one of the biggest factors in all of this. New shooters are encouraged to find the reticle that agrees with their eye and their style of shooting and we have lots of different reticles that are really good.

What are some of the future developments in rifle optics that we can look forward to either from ZCO or the industry in general?

ZCO is looking heavily into a lower magnification type optic, something that can be used for hunting and possibly cross over into competition shooting but that is still in the research and development phase. We don’t have anything ready to announce at this point but know we are doing our due diligence to make sure it is something that we want for our product and our brand name to fill that niche in the industry. We definitely take our time and do the research to make sure the features of that type of scope are filling a need in the industry. 

Any thoughts on making a scope for the AR platform market?

Probably not just yet. There are a lot of 1×8 or 1×10 and other mid-range magnification scopes out there. What we are looking for in the United States is more of a 2×16 magnification range hunting scope that might be applicable to cross over into long-range competition. An optic that they may have on their hunting rifle that if they decide to try a competition, they already have an optic that is capable of that as well. There is nothing definite saying that we will offer that, but we are looking into it. 

I know you’ve mentioned the ease of controls and the robustness of ZCO scopes, but what makes the ZCO rifle scopes better than the competition?

Mechanical precision, and durability in the construction, all come together as a whole package. If the mechanics aren’t doing what they are supposed to do, then that needs to be addressed. We do everything that we can to make sure the mechanical precision is the best as any you are going to get from any manufacturer out there. When you dial your controls, you are going to get that same amount of movement of your reticle for your point of impact every time. 

One of the biggest things that we do focus on is impact testing for our scopes making sure that under recoil or if your rifle takes a fall you can rely on the scope maintaining that post of impact. Obviously, there are other things that go into a point of impact change such as the bedding of the action to your chassis or stock or the way the entire rifle is put together, not just the construction of the optic. We want you to be able to rely on our scope holding zero from the optical standpoint. One of the advantages of starting the company, starting with a clean slate, was that we didn’t have to reuse specific parts. Jeff had 30 years of experience with research and development, quality control, and building of high-end rifle scopes. He knew exactly what to look for when building rifle scopes. The impact testing protocol that we have came from his previous experience. He and the engineering staff went through several different iterations creating stronger internal components to make the scope more durable and precise. 

I think we have one of the most feature-rich rifle scopes in the industry. One example of that is the locking diopter. The locking diopter allows you to set the reticle focus to your eye, lock down the lock ring and prevent any changes to that setting should something like the flip-up caps be twisted or moved. We also have a magnification change lever built into the mag ring, small but enough that you can get your finger on it and make an easy change to your magnification without the need for an extra lever dropped onto the side of your magnification ring. Jeff and the design team also paid special attention to the amount of tension on the magnification ring so that it is not too loose or overly stiff. Another feature is the locking controls for your elevation and windage. Some shooters like to have locking elevation and windage, while others do not want locking elevation so we came out with a non-locking elevation turret. This is a retrofit we can do directly with our dealers or current customers with locking turrets can send in their scope and have that retrofit done. 

Another feature is the way our scopes handle parallax adjustment. We have a very generous depth-of-field (from the closest in-focus object to how far out objects remain in focus) that is something that competitors and hunters really appreciate because you don’t have to adjust parallax nearly as much as you would with some of the other scopes out there and under time, this is one less thing to worry about. When you are playing in the high-end rifle scope industry, illumination management is critical. We have military customers that use night vision equipment in front of their optic so they require a very low-intensity illumination so we need to provide that. Also, hunters that find themselves in the low light times of dawn and dusk, especially in darker, timbered areas, might want very little illumination. So our scope has a constant rate reostat, not a stepped click-type adjustment to adjust the intensity so that as soon as you turn it on it is very low and can increase in intensity to almost daylight-bright illumination levels. Another feature is the elevation zero-stop built into the turret. You do not need to take the turret off to set the zero stop so that prevents dirt and debris from getting into the scope should the zero stop need to be adjusted in the field. There are only two set screws that the end user needs to worry about, all else is contained. So we just continue to develop and refine where we can. 

What would you tell shooters they need to think about before buying a scope?

That all comes down to the intended use or uses for the rifle or rifles that the scope is going on. You’ll want as much optical performance from the scope for your intended hobby. Consider the size and weight of the scope in the overall size and weight of the rifle. When walking a great distance you’d want a very light rifle vs driving from one site to another where a bench rest might be set up and you can have a rifle that is a lot heavier. Consider the overall optical performance including field-of-view, light gathering, and resolution. When considering light-gathering performance, most shooters shoot in daylight conditions and may not need ultra-low-light performance. Shooters should also consider resolution. We want to provide superior resolution allowing shooters to pick out the fine details in the image. That comes into play when defining the edges of a steel target or defining individual impacts on that target. 

Why did ZCO go with a 36mm tube?

We have had the question since day one. That diameter wasn’t chosen as just an arbitrary decision to go with a bigger tube for the heck of it, but was chosen for a very specific reason. We weren’t the first company to go with a 36mm tube as other companies had gone with that size or even larger. We went with that size in order to maximize the elevation and windage adjustment travel, some of the largest in the industry, especially for shooters shooting intermediate to long-range to ELR distances. That diameter was also chosen to increase optical performance by allowing for larger internal lenses. 

Are there any plans for ZCO or any other manufacturer that you’ve heard of to include electronics such as a heads-up display or range finding in future rifle scope designs?

Not at the moment. We have talked about that and again, we do our due diligence to make sure that any feature that makes its way into our scopes does so for a specific reason and is as good as it is going to get. So we have talked about it but is it on the list of something that we will do? Not yet.

What are some of the advantages of having that control over the entire process?

We don’t outsource. We do get our glass from the glass manufacturer. They are a company that is the best at what they do and we are not interested in getting into glass manufacturing. All of the others parts are manufactured in-house and are not tied to any other company in Austria. We have our own high-end machine shop as some of these parts need to have tightly controlled specifications and tolerances. The benefit of controlling the entire process is that when we decide to make a change it is much easier to do because we do not have to communicate with someone else to specify whatever that change might be. We can make prototypes and do some immediate testing to determine whether it works or does not work and quickly make further changes. So it is a very streamlined process.

Well that about wraps it up. Thank you Nick for taking the time to speak with us!

Coatings: A Primer

Anodizing, Bluing, Parkerizing, Nickel Plating, Cerakoting…  choosing a coating for your firearm or simply determining which coatings are on the firearms you already own can be a daunting task. It is also near impossible to select a “best coating” as that choice is heavily determined by how the firearm is used and maintained.

Coatings can be broken down into two main types, those that oxidize or otherwise change the chemical makeup of the existing metal’s surface, and additive coatings like paint that are applied over the existing metal and add an additional layer of thickness to the firearm’s surface.

Anodizing

Unlike paint or plating, anodizing is not a coating that is applied over the existing metal but is an electrochemical process that converts the surface of the metal itself. Anodizing can only be done to non-ferrous metals such as Aluminum and Titanium.

Anodizing is done by passing an electric current through an electrolyte bath containing the aluminum piece. An electrolyte bath is an electrically conductive solution full of readily-available positive and negative oxygen ions. These oxygen ions are released from the electrolyte solution to combine with the aluminum atoms creating an anodic oxide structure at the surface of the aluminum piece being anodized. Anodizing slightly increases the dimensions of the piece by increasing the thickness of the oxidative layer. Since the anodizing actually becomes part of the underlying aluminum substrate, it can not peel or chip off like paint. The anodizing process also creates a uniform and porous finish that allows for additional coatings and better holds lubricants

Type III Anodizing of aluminum is the current Mil-spec and creates one of the hardest finishes available.

One relatively unknown benefit of anodizing is that it is somewhat environmentally friendly, producing very few harmful byproducts.

Cerakoting

Cerakote is a ceramic-based gun finish that gives the firearm a very hard and durable finish and is extremely heat resistant. Cerakote can be applied to a variety of surfaces and is available in many colors and patterns. It is one of the most durable and low-maintenance firearm finishes available. Since Cerakote is a coating that adds a layer of thickness (typically .0015 to .002 thickness), it should only be used on firearm exteriors where this thickness can be tolerated.

Black Nitride

A black nitride finish is created when an additional step called postoxidation is added to the ferritic nitrocarburizing process. Postoxidation creates a layer of black oxide that greatly increases the corrosion resistance of the treated substrate while leaving an aesthetically attractive black color. The ferritic nitrocarburizing process diffuses nitrogen and carbon into the surface of ferrous metals creating a two-part surface (an outer iron nitride layer and an inner nitrogen diffusion layer). Nitrogen and carbon (hence the name) are absorbed into the surface of the metal creating reproducible and uniform layers with a predetermined thickness across all areas of the metal. 

DLC (Diamond Like Coating)

DLC is a carbon layer that is about as hard as diamond and is suitable for heavily used guns. It is a physical vapor deposition (PVD) process resulting in an extremely thin coating thickness (less than .005″) that can be applied to carbon steel, stainless steel and aluminums. It is a dark charcoal color when but appears black when oiled. A unique attribute of this coating is that it reflects the gun part’s surface before the process (matte surfaces appear matte again, mirror polished surfaces keep their mirror surface) after the coating process.

Bluing (Black Oxide)

One of the cheapest and longest-used coatings is bluing. Many of us will be familiar with the combination of a blued barrel with the walnut stock of a cherished hunting rifle.  Used on ferrous metals, blueing is used both to protect the underlying metal from corrosion and to reduce glare. The bluing process is an electrochemical process that converts the surface iron in the steel to black oxide. The black oxide finishing process is an electrochemical reaction that oxidizes the metal’s surface transforming the surface iron to magnetite therefore not changing the physical dimensions of the piece.  When combined with a frequent, light coating of oil, bluing makes for a reliable, cost-effective, and timeless coating for your firearm.

Parkerizing (Phosphating)

Many of us are familiar with Parkerized firearms as this is both the standard coating used by the military as well as the finishing process used to protect Glock pistol slides. Parkerizing (named after the Parker Rust-Proof Phosphating Company) can only be used on ferrous metals such as steel and alloy steel and creates a surface coating that improves wear resistance and increased protection from corrosion. Phosphating is a process in which the piece is immersed in phosphoric acid solution creating a protective iron-phosphate layer and a dark grey matte finish. Like bluing, it does require frequent oiling to prevent corrosion. 

Check Back

We are currently exploring several of the coating options discussed above and will update this article and our social media with photos of examples as we complete projects.

Wind Calls: What is Your Gun Speed?

Until we get to ranges beyond 1,000 yards, the basics of determining elevation are pretty simple. Combine muzzle velocity (MV), ballistics coefficient (BC) and density altitude (DA) into an algorithm and determining the bullet’s point of impact becomes pretty academic and fairly precise. Wind is the wild card.  

Wind. We can apply some basic rules to judging wind but we all know this is nothing more than educated guessing. Wind can change at various times and at various distances all along the bullet’s flight path making wind calls an imprecise equation on all but the calmest of days. Yet we still try to apply the precise calculations of elevation to wind despite the imprecision of it all. What results are complicated dope cards with various holds at various wind speeds that must be referenced between shots of varying distances. 

Is there a way to simplify this information while keeping as much precision as possible in an already imprecise process? Fortunately, there is a way to change how we look at the dope for a particular round that will result in information that most of us can keep in memory. This new process will be most helpful on timed stages because you won’t have to take your eyes off glass to consult a ballistics table since your wind holds will be memorized. Read on to learn how this can be done.

Determining your rifle’s MPH.

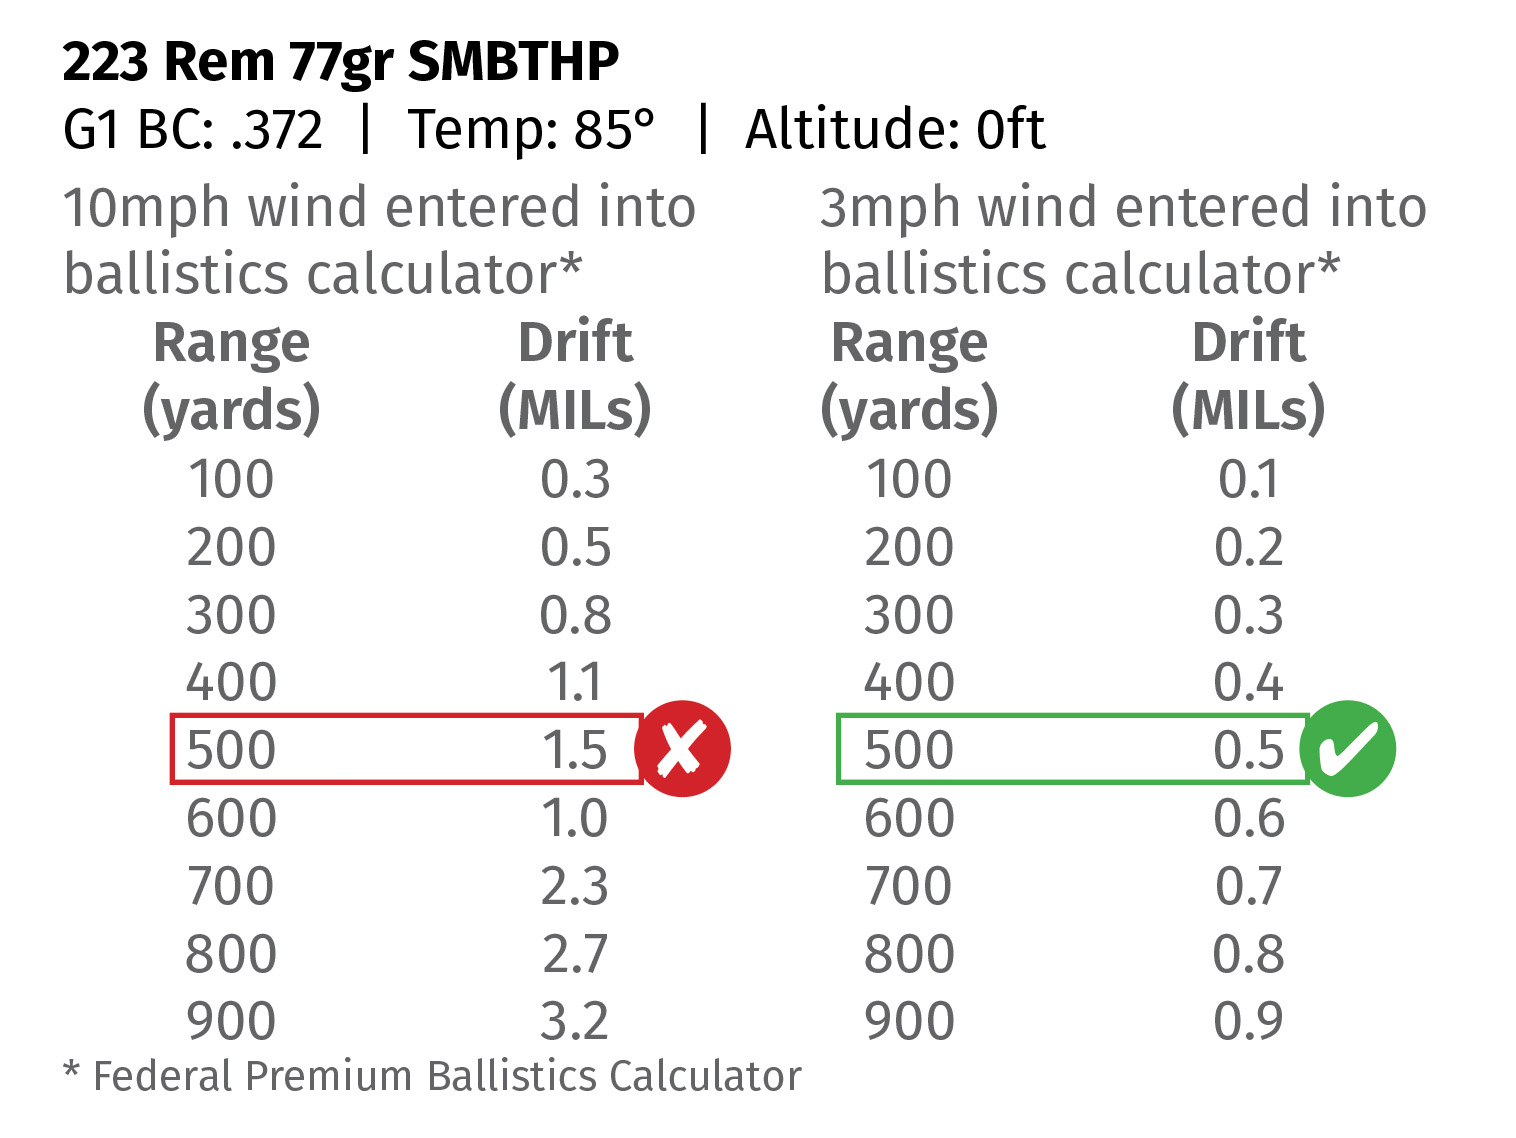
The first step in this process is to determine the MPH of your rifle, or more correctly, the MPH of the round you intend to shoot from your rifle. (Yes, MPH does stand for miles-per-hour and in this context, miles-per-hour refers to wind speed) To complete this, we will enter various wind speeds into a ballistics calculator until we get roughly one tenth of a MIL wind hold for every 100 yards.

Stated another way, we are determining how much wind will force the round to land .1 MIL from point of aim per 100 yards. So working with the desired load, begin entering different wind speeds into a ballistics calculator until you reach 0.1 MILs of drift per 100 yards. 

Caption: Using 500 yards as an example, entering a wind speed of 10mph into the ballistics calculator results in a 1.5mil hold at 500. However, entering a wind speed of 3mph results in a .5mil hold at 500 yards, and this is the result we are looking for. As you can see, that same 0.1 MIL hold per 100 yards holds true out to 900 yards for this particular round. 

With certain loads, this formula will break by a tenth of a mil after a certain distance, but will remain close enough to keep you on a 1 moa target at most commonly encountered ranges for that particular load.

Making Wind Calls from Memory

With the information from the table above we know that the rifle firing the load used to create the table is a 3mph gun. We can now use this information to make quick wind hold adjustments from memory:

Example 1: A target at 400 yards in a full-value 3mph wind will need a 0.4mil hold. If the wind is that same full-value at 9mph, we can quickly triple the hold (as the wind speed itself has tripled) to 1.2mils. 

Example 2: Using the same target distance of 400 yards, but assuming that same 9mph wind at a 75% value and we use 75% value of the hold, or 0.9mils.

Checking the Math

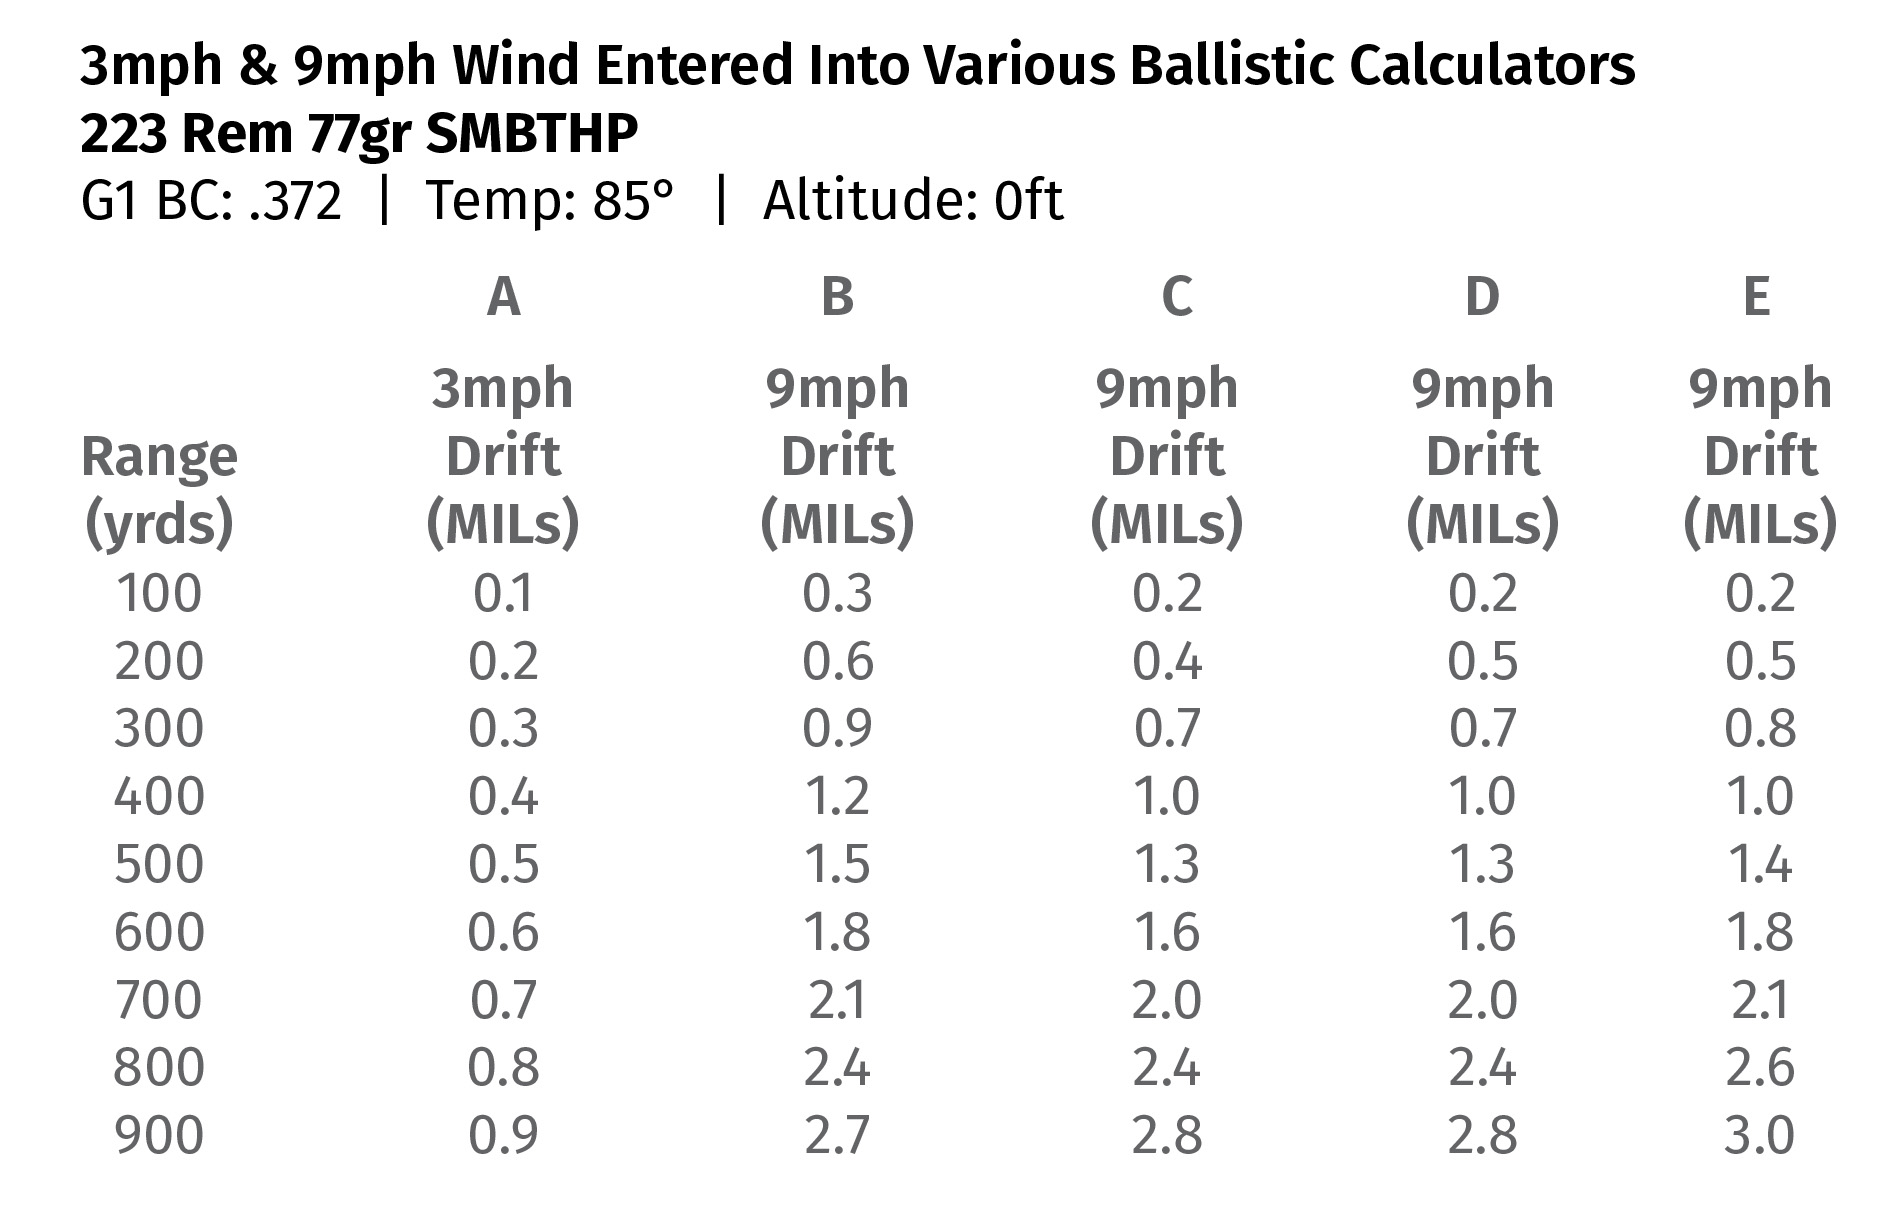
As with all dope, it is best to confirm the information by actually sending rounds down range and verifying the point of impact. However, again considering the inconsistencies of wind, this process is still incorporating some imprecision. In lieu of verifying actual rounds downrange in actual wind, we’ve entered our new calculations into multiple ballistics calculators to determine how close our simplified wind call technique fairs against the information provided by those calculators.

Column A: 3mph wind entered in the calculator resulting in a 0.1MIL hold per 100 yards

Column B: Wind call based on quick calculations considering a 9mph wind using the new technique

Column C: Wind call based on Federal Premium Ballistics Calculator considering a 9mph wind

Column D: Wind call based on Hornady’s Ballistics Calculator considering a 9mph wind

Column E: Wind call based on Berger’s Ballistics Calculator considering a 9mph wind

As we can see in the table above, the various ballistics calculators remain within 0.1–0.2 MILs for most distances out to 900 yards for this round. All else considered, the error still keeps you on a 1MOA target at 600 yards, and it’s done all in your head without having to come off glass to read a dope chart. Again, this technique is most useful on timed stages where targets are presented at various distances and the time saved by not having to stop to reference a complicated dope chart might result in additional time to send rounds downrange. 

One additional advantage to using this technique is when communicating wind calls between two shooters in team events. As is most often the case, two shooters in a team event may be shooting two different calibers with two different ballistics. The first shooter may be getting impacts while holding 1.0MILs but that information may not be useful to their teammate that may only have to hold 0.4MILs to get impacts at that same distance. However, if the first shooter states that they are getting impacts while using a 5mph wind, that information is immediately useful to the second shooter.

In conclusion, we hope the ability to quickly determine a wind call without having to refer to a ballistics table mid-stage will provide shooters with more time to get accurate rounds downrange. So run some math and try this technique on your next range day!

First Impressions: 22 GT

What is the 22 GT?

Based on a .308 case rim, the 22 GT is a .22 caliber version of the 6mm GT and is a result of a collaboration between George Gardner of GA Precision, and Tom Jacobs of Vapor Trail Bullets. The benefits of the 22 GT include problem-free feeding in AICS magazines and standard short action receivers, properly headstamped brass, an appropriate case volume for lower SD velocities, and lower recoil combined with higher speeds and flatter trajectories. 

Reloading

We had no issues with reloading 22GT. Similar to 6GT, Alpha Munitions offers 22GT OCD headstamped brass ready to load from the factory, so there’s no need to neck down, fireform, etc. You certainly can use 6GT brass that has been converted to .224, but overall, it’s a very straightforward process. Here is our process from 1x fire to reload:

  • Anneal every 3rd firing
  • Lube, size, and de-prime fired cases using a SAC modular sizing die and .22 cal decapping pin (We used a .247 neck bushing and target .002” of shoulder bump)
  • Tumble brass with stainless steel media for ~30-45 minutes and let dry (Dry tumbling and ultrasonic cleaners also work here)
  • Use an expander mandrel to set neck tension (We use a .2225 diameter expander)
  • Trim (if necessary), chamfer, and debur case mouths
  • Prime – Load – Shoot

Brass, Bullet, Primer, Powder

Our setup: 28” Brux 360Precision Custom Competition Contour barrel, 1:6.5” twist, standard spec 22GT reamer w/ .169” freebore

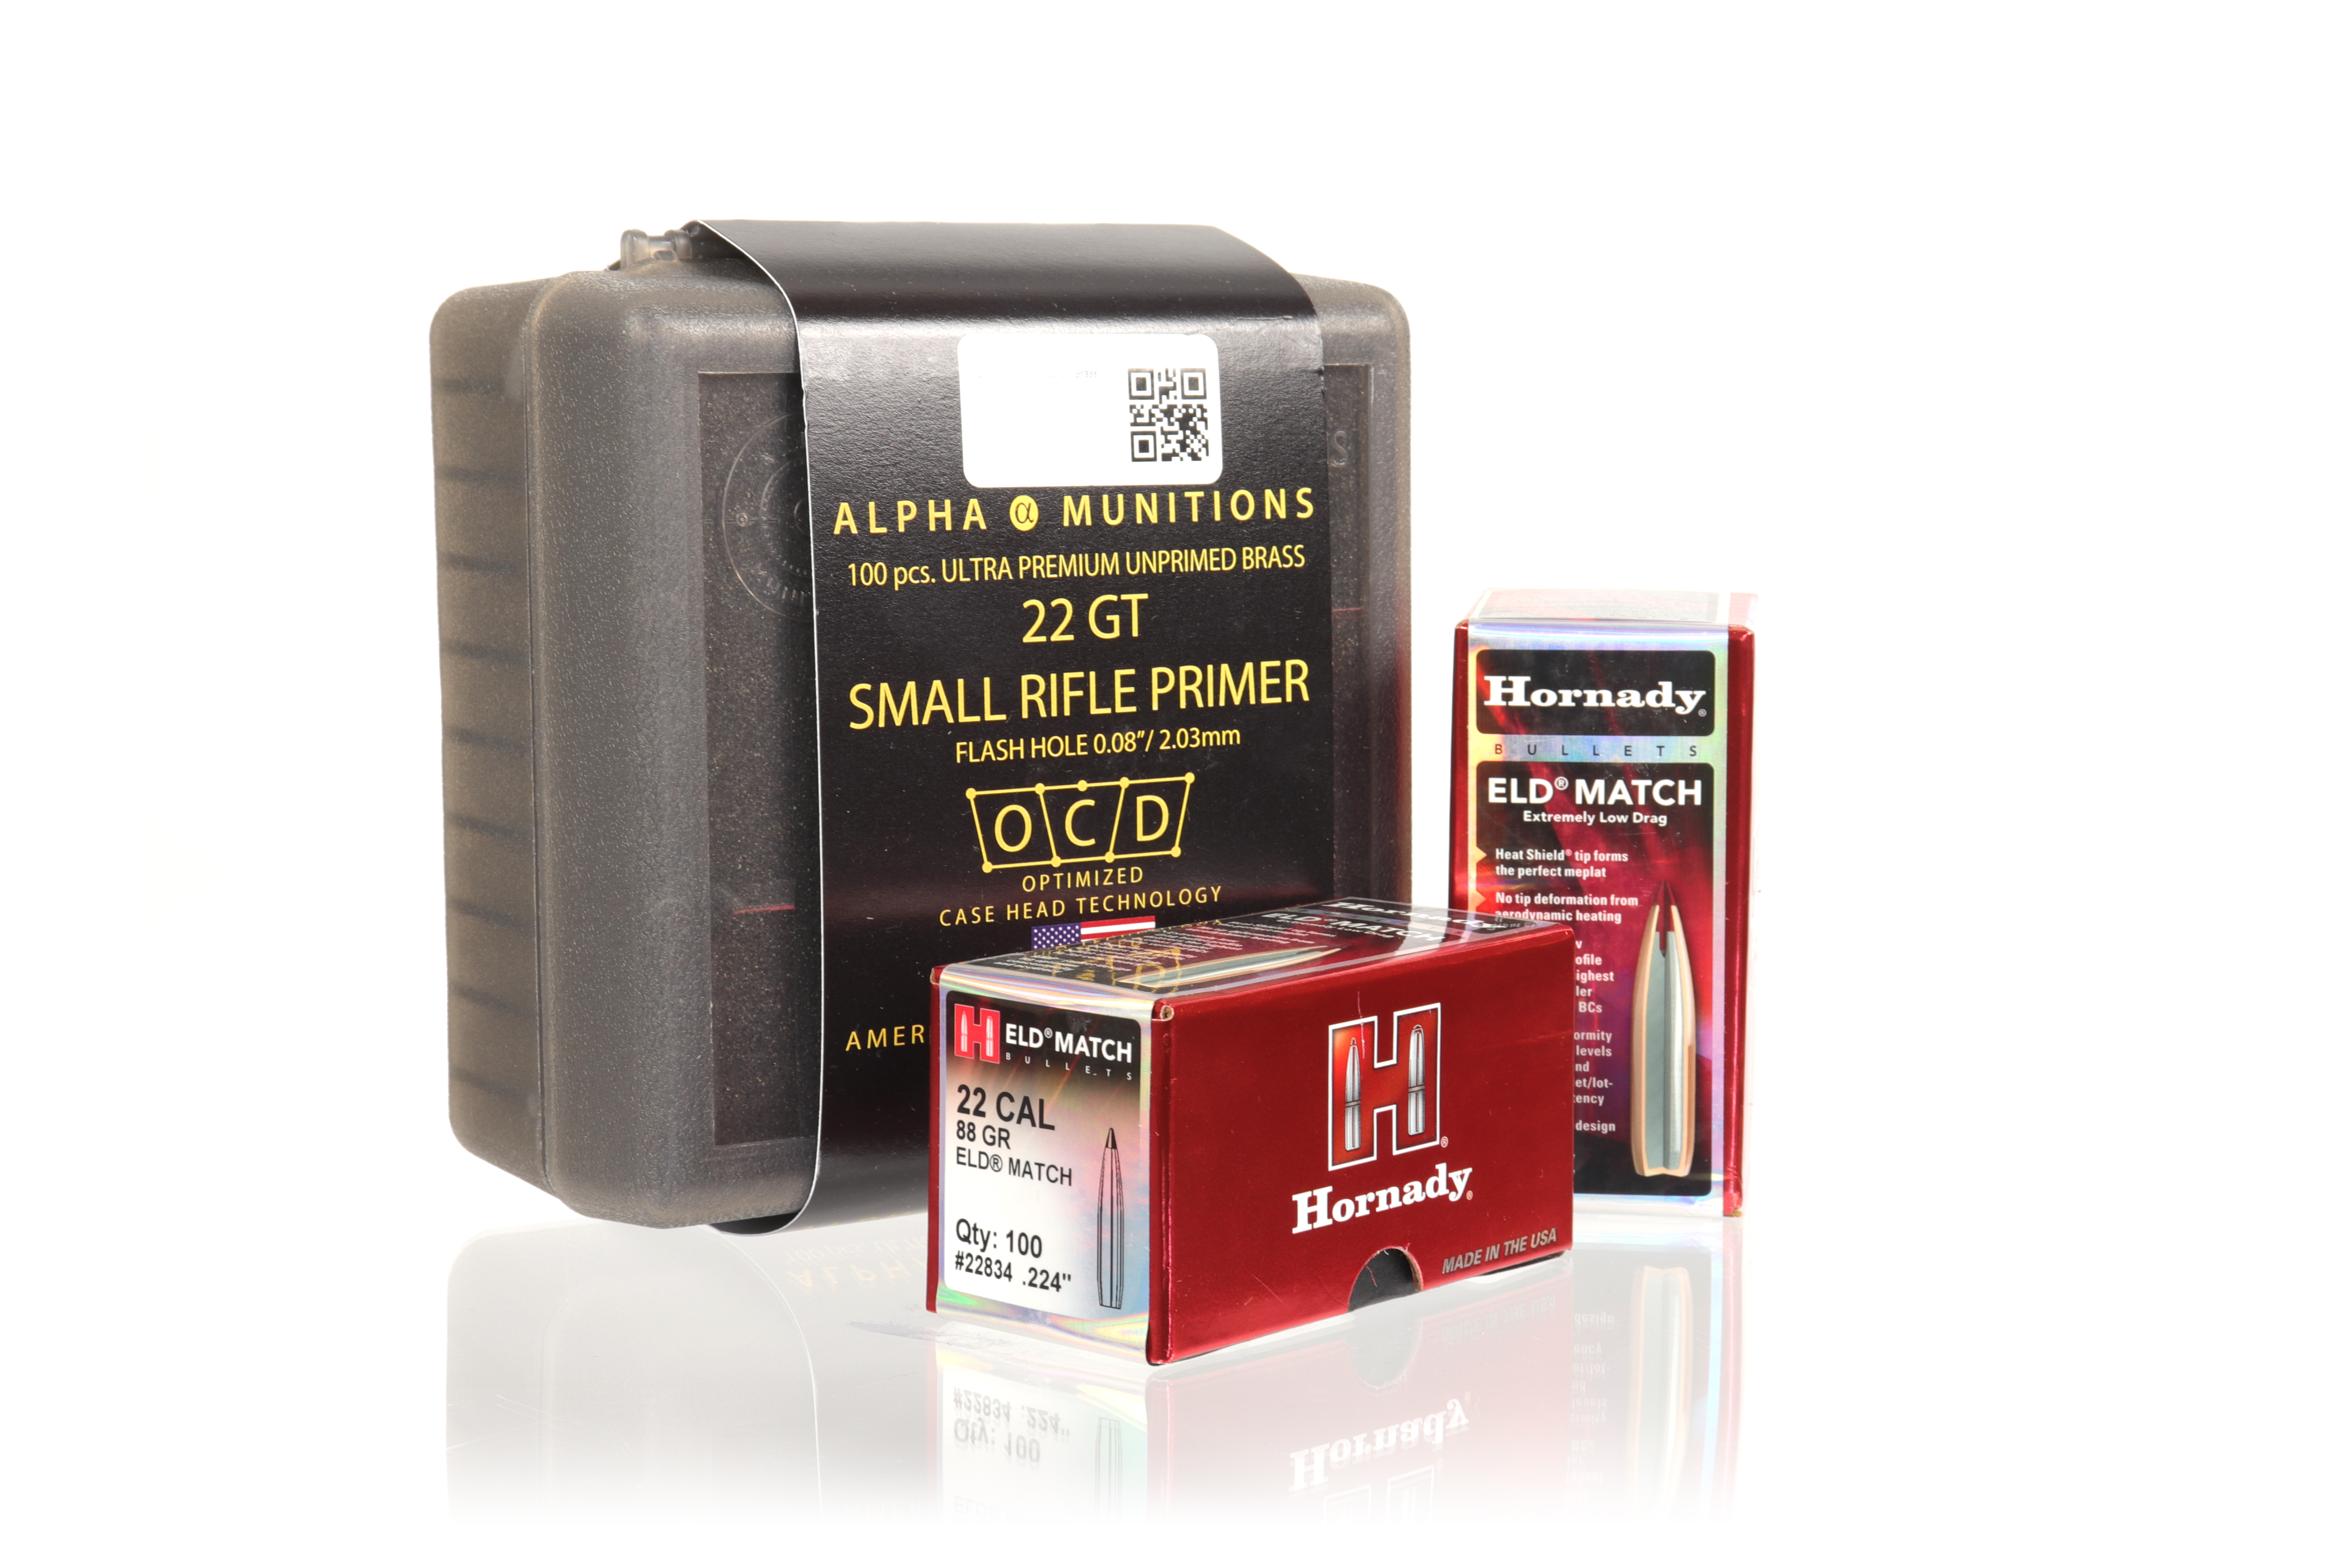
Our components: Alpha Munitions 22GT OCD brass, Berger 85.5gr LRHT, Federal 205M, and Hodgdon H4350

General disclaimer: We highly recommend selecting a bullet based on your application, chamber, barrel twist, and freebore. Similarly, select a powder based on your bullet selection, barrel length, and speed goals. It’s important to use components that work well together in your gun and will maximize performance for your specific use. What works for us in precision rifle competitions is obviously not optimized for varminters, hunters, etc. With that said, there are many different combinations that can be used effectively in a 22GT. Hornady 88gr ELD-M, 90gr A-Tips, and Sierra 95gr SMK are all popular bullet choices as are any powders with burn rates somewhere between Varget and H1000 (H4350, RL-16, and H4831sc).

No did not experience any issues with component availability. The brass comes and goes depending on Alpha’s production cycle, but as mentioned earlier, 6GT brass can also be converted (Hornady/GAP/Alpha) if needed. The Berger bullets have been and continue to be regularly available, along with Hornady ELDs and A-Tips. Powder and primers will likely be the main shortage culprits, but as stated above, there are plenty of combinations that will work well depending on what you have or can find.

Actions

Between 22GT and 6GT, We’ve used:

  • Accuracy International AT-X Gen 2 (current)
  • R700 footprint custom clones (Impact, Defiance, etc.)
  • Tikka T3x

Feeding issues 

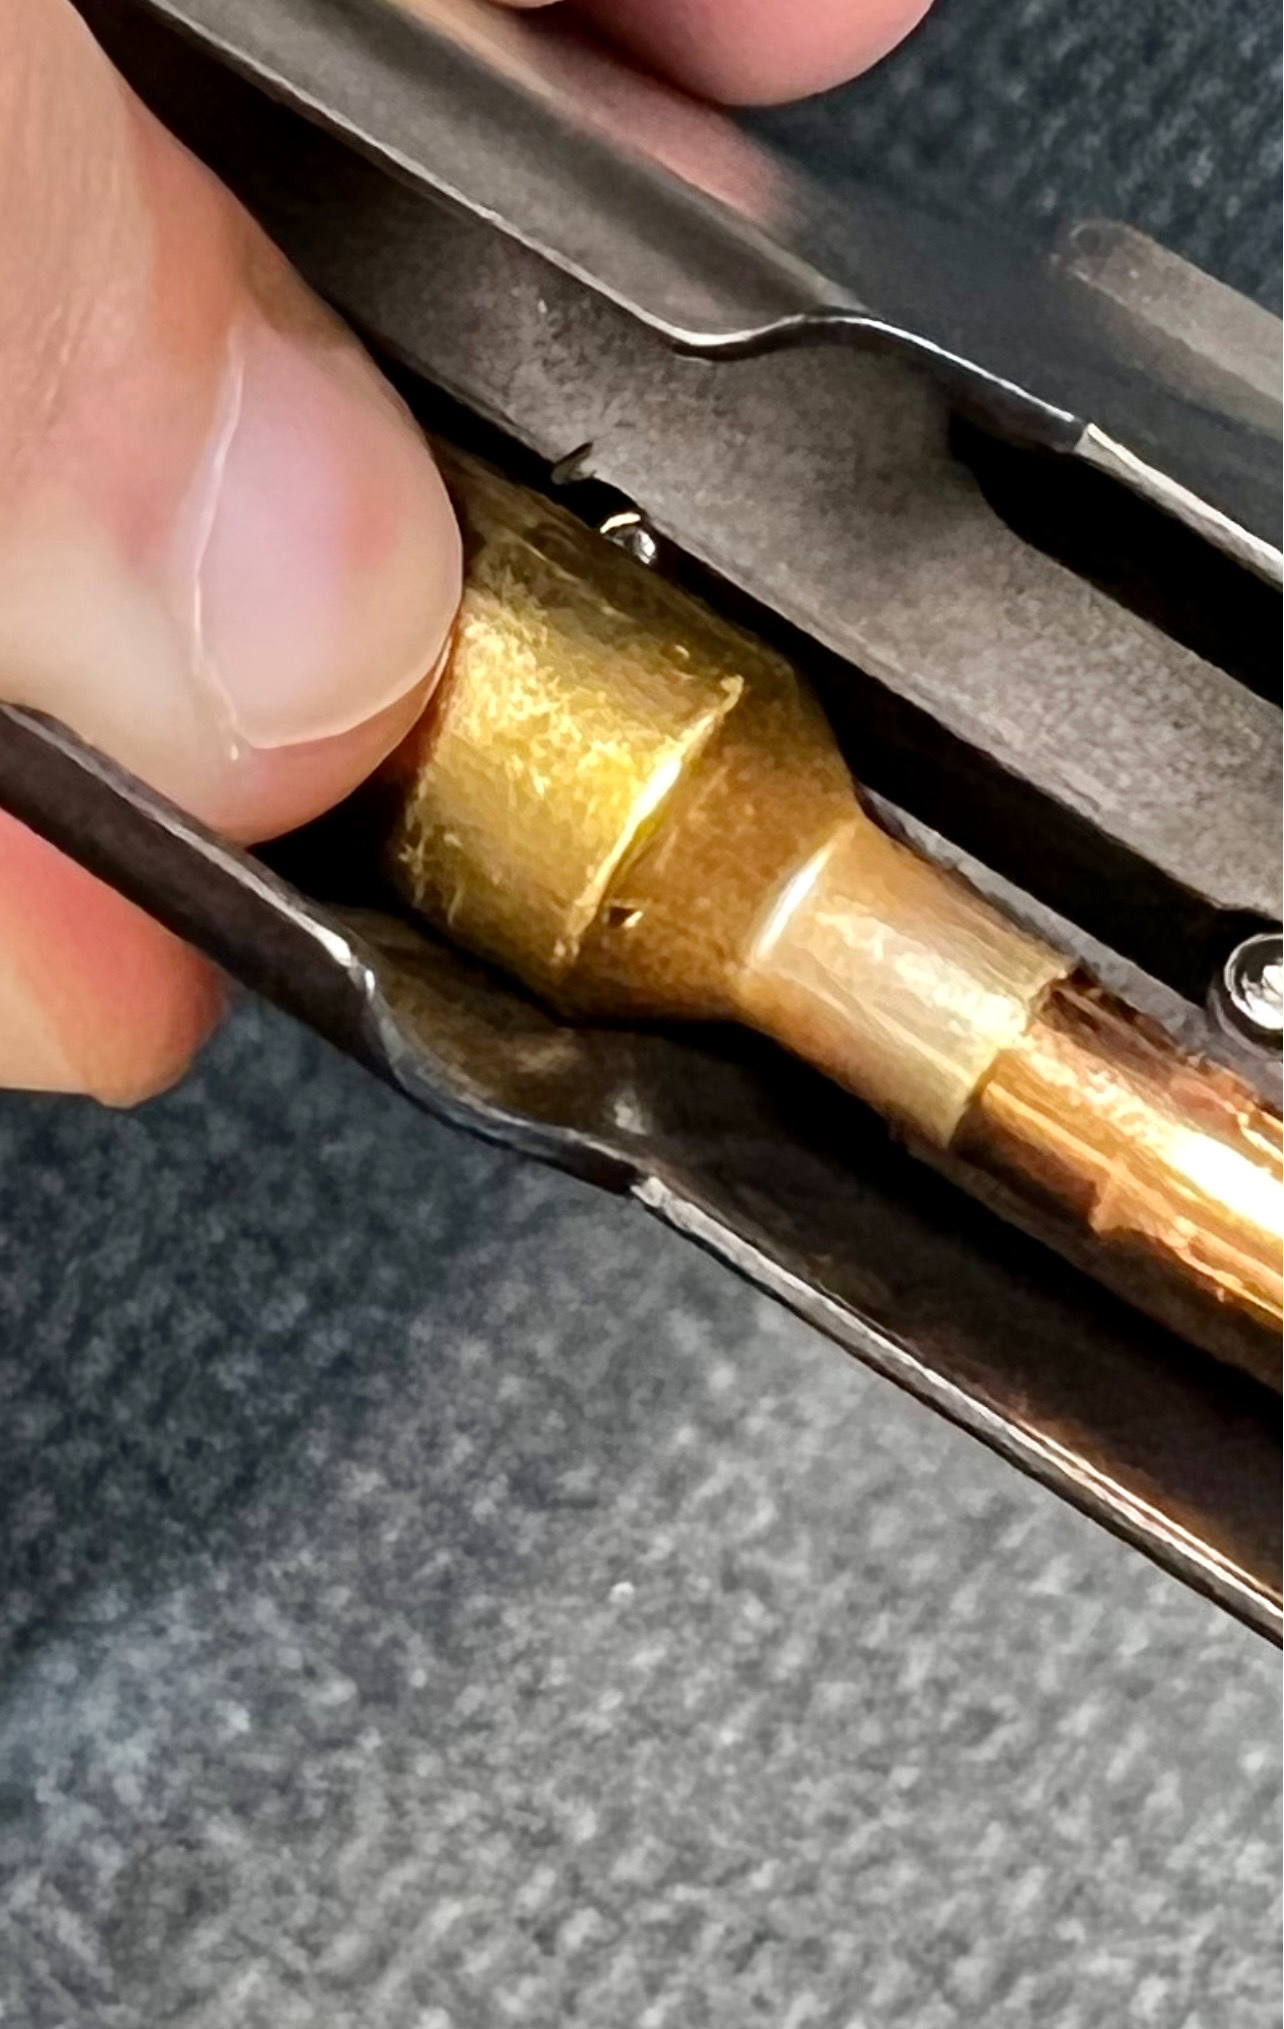
We experienced very small feeding issues when we first tried it in the AT-X with AX/AW mags. Seating rounds as far rearward as possible would cause the bolt to skip over the case head instead of picking it up and feeding it into the chamber. The remedy to this was to move the cases forward in the mag so the shoulder interfaced with the forward rib in the mag (see picture). HRD 6BR/Dasher mag kits can likely be made to work with slight modification to the spacer (they are slightly too long to work with the GT case), but just moving the cases forward in the mag has been 100% reliable so far.

Feeding issues with GT cases/AICS mags in general have also been well-traveled, though we have not come across one so far that can’t be made to work reliably with slight feed lip modification. This is mainly action, chassis, and mag dependent, but the issues are always similar to those described above where the bolt will not always pick up the round. We’ve also seen GT cases fed using BR spacer kits (MDT, Primal Rights, etc.), though this will likely limit your seating depth as you run out of room in the front of the mag.

Chronograph Results

Again, as a general disclaimer, we always recommend starting low and working up to pressure, and velocities will always depend on a number of factors (environmental conditions, barrel length, bullet/powder used, and so on). In a standard 26” barrel with standard freebore, a 22GT loaded with 85-95gr bullets will yield muzzle velocities anywhere between 2900 and 3200fps comfortably.

In our test gun specifically, 35.0gr H4350, Berger 85.5gr LRHT, seated ~.020” off the lands produced an average MV of 3101fps with standard deviations and spreads in the single digits. We are confident in saying this charge weight is operating well within the pressure limits of a GT case, but again this will largely be dependent on the end user.

Recoil

Like most of what we’ve stated above, recoil will always depend on a multitude of factors. We’ve spent most of my time shooting competitively using 6mm bullets (105gr Hybrids to be exact) at velocities from 2800fps all the way up to 3150fps. Without going too far into how bullet/rifle weight, balance, height over bore, muzzle devices, etc., all affect felt recoil, We can comfortably say that the 22GT recoils less than its larger caliber counterparts.

Basic physics states that for every action, there is an equal and opposite reaction. This means that if you shoot a 105gr bullet at 3150fps and an 86gr bullet at 3150 fps out of the same gun, you will feel less recoil with the lighter bullet. With that said, we believe there is a point of diminishing returns when it comes to recoil impulse. All else being equal, yes, a 22GT “outperforms” a 6mm in this regard, but there are many different ways to manipulate the way a gun reacts when you fire it. In essence, if you’re trying to decide between .224 and .243, We would not let this be a determining factor.

Performance

Both 22GT and 6GT are high-performance, competition-oriented rounds. Both perform exceptionally well in terms of accuracy and consistency, though we would argue that a majority of that comes from the ammunition/loader/shooter, and not the round itself. Having used various 22cal and 6mm cartridges over the last few years, we don’t believe there is a right or wrong answer – there are a lot of different ways to achieve the same end goal, but the GT is definitely up to the task.

Specifically speaking, we feel that the high-BC .22 cal bullets do as well as or even better in the wind than some 6mm offerings at this point, but again, it will largely depend on the shooter and application. It has not been uncommon to see the 22GT produce 100-yard 5-round groups in the .1s and sub-.5 MOA groups at distance. Then again, it’s not necessarily uncommon to see a 6BR, 6 Dasher, or 6 Creedmoor yield the same results.

Final Thoughts

All-in-all, we really like the 22GT for its performance and ease of use. It’s extremely consistent, low recoiling, and forgiving to load for. With that said, we say the same thing every time we try a new round: it works well, but it’s certainly not hitting targets that we would otherwise miss.

Machined vs Forged

Machined

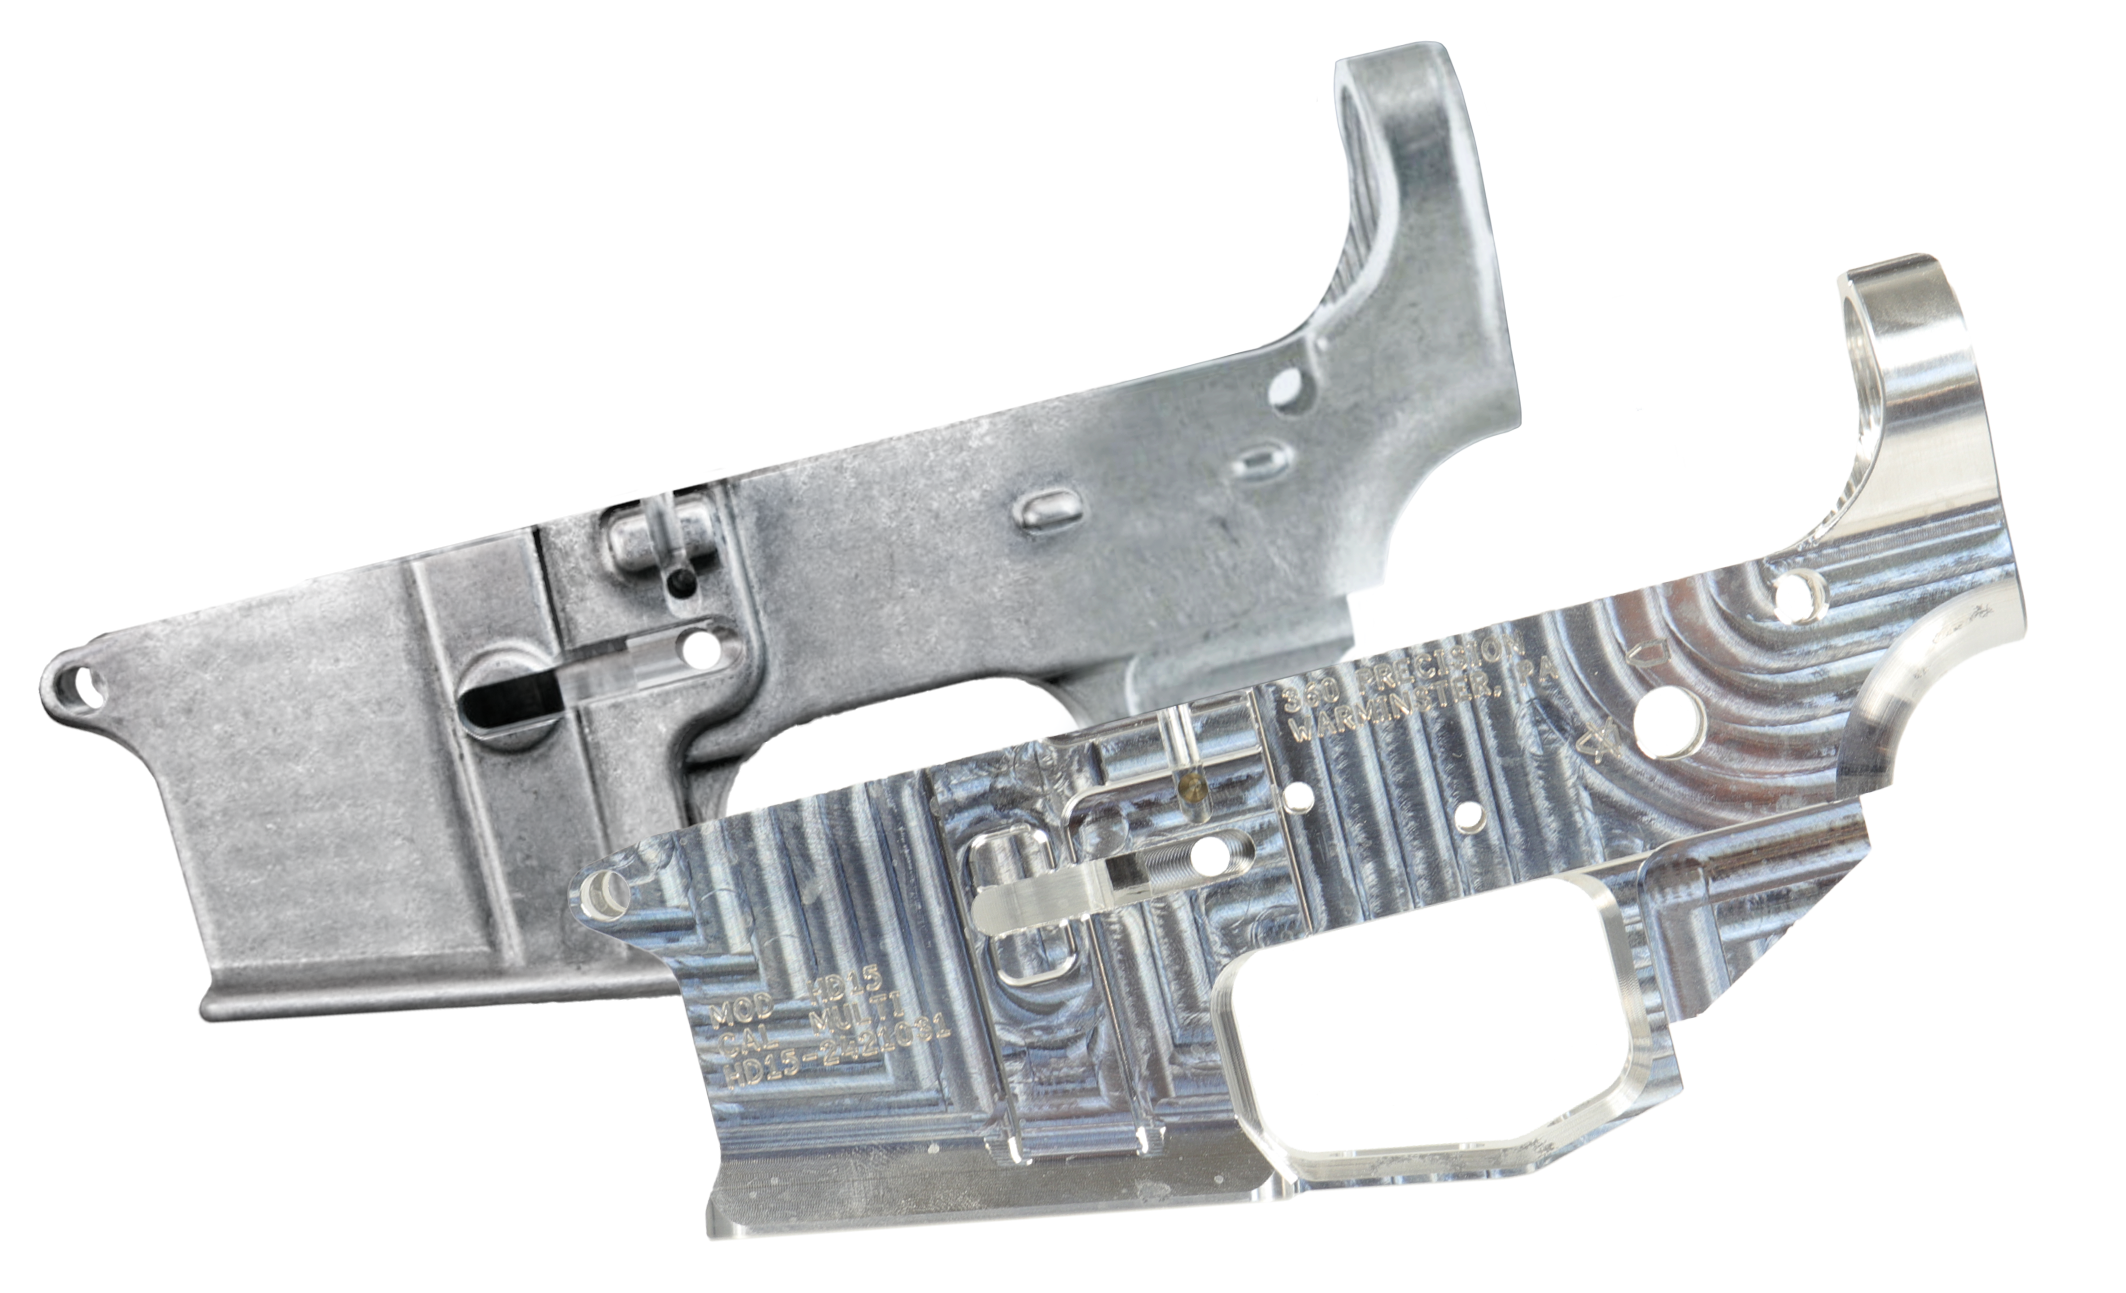
Machined receivers are milled out of a solid block of aluminum called billet stock.

The two most common aluminum alloys used for machining AR receivers are 6061-T6 and 7075-T6. The main difference between the two is the amount of zinc alloyed with the aluminum. Among the aluminum alloys suitable for firearms manufacture, 7075 aluminum offers the greatest strength, corrosion resistance, and resistance to heat. T6 refers to the type of temper (the heating and cooling process) used to increase the strength over that of untempered metal.

Advantages of billet-machined receivers include the extremely tight tolerances (often measured to within a tenth of a thousand of an inch = .0001) made possible by the machining process. Tight tolerances throughout a build translate into increased accuracy. In addition, since these receivers are cut by a CNC machine following a program, they can be customized to create shapes and features not possible through the forging process. 

Forged

Forged receivers are blocks of aluminum that are heated and then pressed into shape under several tons of pressure. The forging process forces the aluminum grains closer together and aligns the directionally thereby increasing the strength or the resulting part. Since forged receivers are stamped from a single mold, they can be mass-produced and are therefore less expensive and more common than machined receivers. A disadvantage of the forging process is the inability to create some of the sharp edges, fine details and tight tolerances made possible by the machining process. 

What about weight and strength? 

Weight differences between the two tend to be negligible and are most affected by any customization of the receiver away from mil-spec. And unless the receiver is used for other than its intended purpose (hammer, battle axe, etc.), the strength differences between the two types will be negligible. 

In conclusion, whether you choose a machined or a forged receiver, either will give you decades of problem-free service.

Range Medical

Be prepared for medical emergencies while at the range

We all know the three rules of gun safety; keeping the muzzle pointed in a safe direction, keeping the firearm unloaded until ready for use and never placing your finger on the trigger until ready to shoot. Following these rules helps to ensure our safety and the safety of those we’ve brought with us to the range. However, we can never be sure of the level of safety being exercised by other groups at the range, and accidents can and do happen. For this reason, some thought and preparation should be applied to the scenario of you or someone in your group suffering a severe injury while at the range.

The simplest preparation for a medical emergency while at the range is information. Since you yourself may be the victim of a medical emergency, everyone in your party should know the name and location of the range as well as the location and directions to the nearest emergency medical facility. Calling 911 should always be your first course of action in any emergency. However, the tendency for gun ranges to be located in areas with weak or no cell signal makes having this backup plan a good idea. 

In addition, everyone in your party should know the location and contents of the first aid kit. It would be a shame if available medical supplies were not used when needed because no one knew there was a first aid kit nearby. 

First-Aid Kits

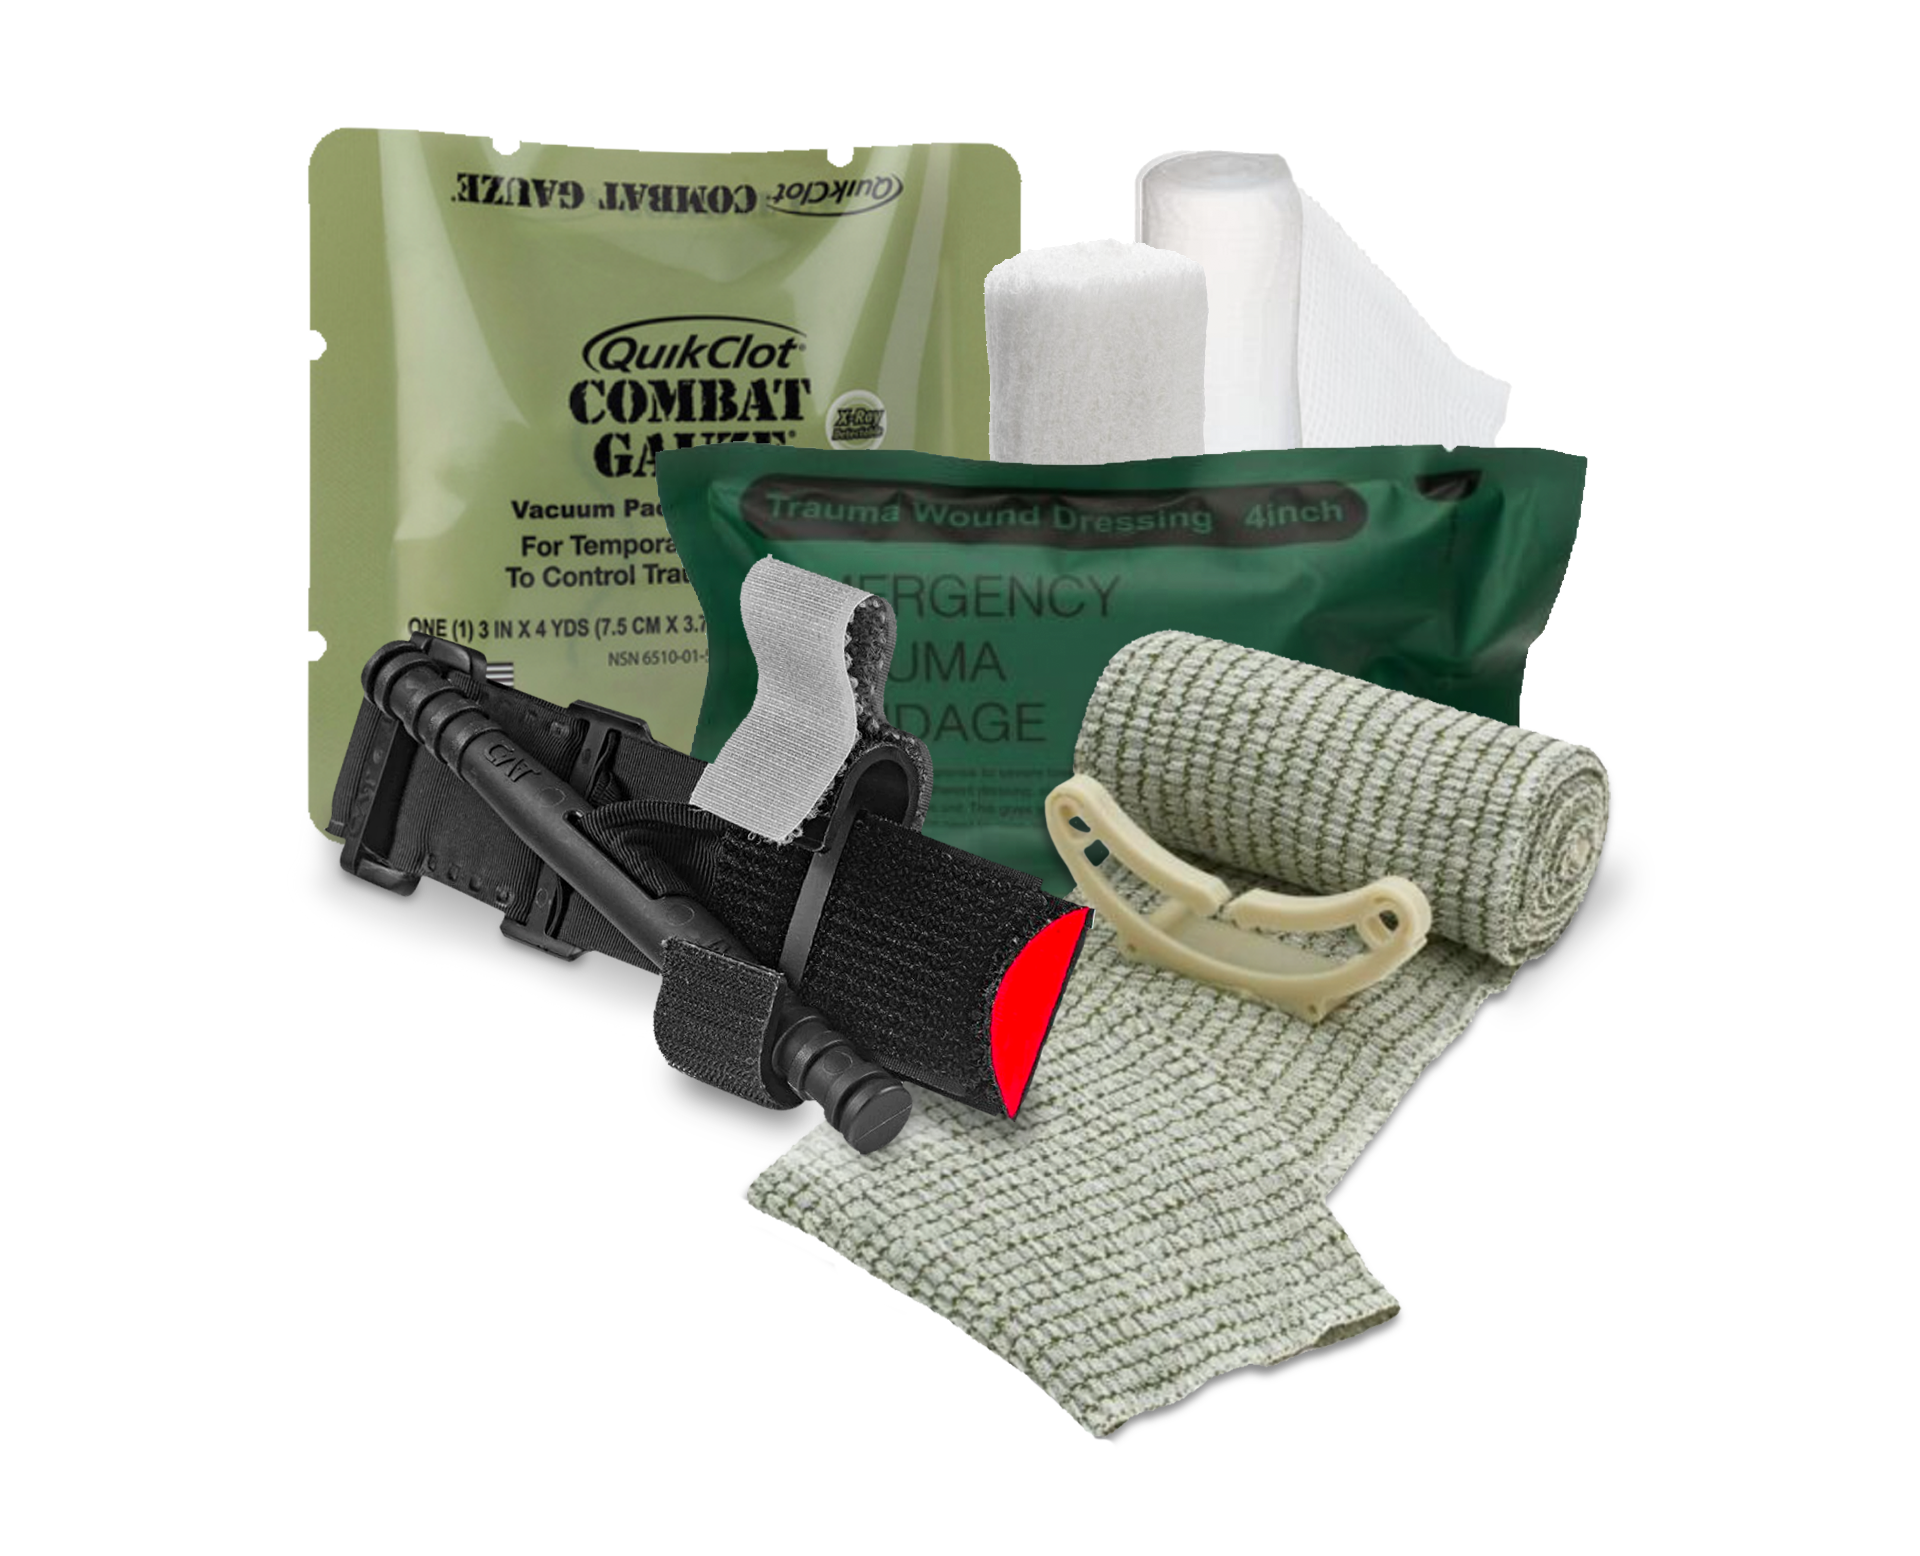
While store-bought first-aid kits are surely better than having nothing at all, buying a kit and tossing it in with your gear is hardly preparing yourself to handle a serious injury. Most off-the-shelf first aid kits are woefully understocked for handling a gunshot wound (GSW) and for this reason, adding to an existing kit or building your own is a better solution. Buy multiples of everything; tourniquets, battle dressings, hemostatic dressings, triangle bandages, gauze, etc. Just about every GSW will result in at least two wounds, an entry wound and an exit wound. In addition, there are several scenarios (passing through both legs, passing through two individuals) where one bullet could create four or more exit and entry wounds.

Training and Practice

Applying a large amount of pressure to the wound, packing the wound, and (if necessary and possible) applying a tourniquet are the steps needed to slow a severe bleed. However, the skills and techniques needed to accomplish this are beyond the scope of this article. If at all possible, obtain first aid training and while any training is better than no training, try to find a first-aid course that focuses on hemorrhage control. 

Once you’ve stocked multiples of everything in your first aid kit, buy one more of each to practice with, and then… practice with them! Keep them separate from your first aid kit and in a location where you will actually practice with them. (Pro tip: keep them wherever you watch TV and practice applying them to yourself or family members while timing yourself against a 30-second commercial spot)

In conclusion, having a properly-stocked first-aid kit and obtaining training on how to use the contents of that kit will prepare you to manage a severe bleed should the unthinkable happen. Stay safe out there!

Hunting for the best rifle

A guide to selecting and building a good hunting rifle

Below are three key elements that you should consider when either building a custom rifle or purchasing a stock rifle. These questions will help ensure that you make a smart purchase and are able to use the rifle for your intended purpose.

1. What are you going to hunt with the rifle?

One of the first question you need to ask yourself is what the purpose of the rifle is. Are you hunting varmints at only a few hundred yards? Or are you hunting elk out west and might have to take a shot at 500 yards plus. A common mistake is to try and have one rifle that will do both. Building a rifle to be the “Jack of all Trades” can be a mistake. When you can, and when the budget will allow, try to build a rifle for a specific purpose.

Second, you will want to look at selecting the right caliber for the critter you are hunting. The common conception is bigger is better. When building a precision hunting rifle that may not be the case. A perfect well-placed smaller caliber shot will be much more effective than a misplaced shot or even worse a total miss. So, you will want to chamber the rifle in a caliber that is enough to take down the animal but is also comfortable for you to shoot accurately. Having a comfortable rifle is key to placing the perfect shot!

2. Where will you be hunting – location and part of the county?

Make sure you understand the laws and restrictions on what you can use based on the state and local areas you are hunting in. You need to consider magazine capacity, bolt action or semi-auto based firearms and ensure they are legal to use in the area and type of game you are hunting.

Also, terrain should to be considered. Will you be hunting in the forest, open fields, or in the mountains? The terrain will determine the weight of the rifle as well as the maximum distance to a target. The stock and barrel will greatly affect the weight of the rifle and caliber selection will help determine the maximum distance for taking down a target.

3. How will you be using the rifle?

Are you going to be using the rifle for back-county hunting, shooting from Blinds or Hides, or will you be tracking your game? This question will help determine the overall weight of the rifle. If you are tracking or back-county hunting a light rifle will be key. Were as if you are hunting from a hide this maybe less of a factor. A light rifle is fine so long as it is accurate, comfortable and made of solid construction such as carbon fiber. Also using a carbon fiber barrel will help reduce overall weight of the rifle.

To discuss a custom rifle build contact us at info@360precision.com or call us at (215) 399-3598. 360 Precision is located in Bucks County – Warminster, Pennsylvania and we offer complete custom-built rifles that can be shipped to your local FFL. If you’re considering a new rifle build give us a call and we will be happy to discuss your project with you.

Best Steps for Accurizing your Rifle

Below are many of the most common steps that you can take to improve the accuracy of your rifle. Having a gunsmith perform the below steps will help improve your rifle’s accuracy and make you a better shooter.

1. Re-cut the face of the action true with the bore

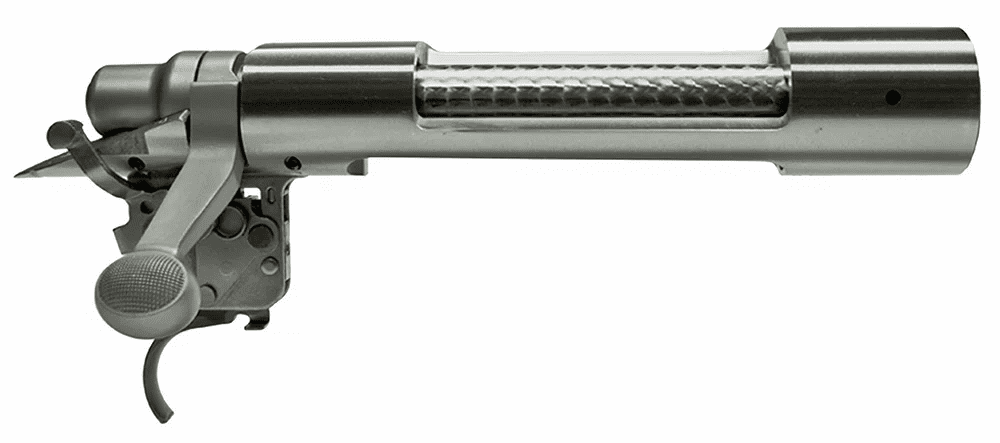
So, what does this mean. The action will be put in a lathe and configured so that it is spinning perfectly true. Truing the action in the lathe means there is no run out in the action. Basically, the action is spinning perfectly on center with no wobble in the work piece. Once this is done the front face of the action/receiver will re-cut so that it is perpendicular to the center bore of the action. This allows the barrel or recoil lug to sit completely flush and straight with the action. We are trying to get the center bore of the action/receiver the same as the center bore of the barrel. The more accurate this center is the more accurate the rifle will shoot.

2. True the lug seats

The seat lugs are the part inside the action that interface with the lugs on the bolt. A rifle bolt will typically have 2 or 3 lugs on it. With the action still in the lathe, the lug seats will also be re-faced so they are perpendicular with the center of the action.

3. True the receiver threads (remove run out from the action)

Typically, factory actions will have run-out in the threads of the receiver. For the barrel to have the best interface with the receiver this run-out or “wobble” in the threads needs to be minimized and removed as much as possible. Run out in factory actions can be .003 to .010 and sometimes even more. This may not seem to be a lot but even thousands of an inch will matter and will be amplified when shooting the rifle particularly at longer distances. If you have the threads re-cut, you will also need to replace the barrel. Since the threads will be cut deeper in this process the old barrel with no longer fit properly. A new match grade barrel is recommended at this point to deliver the best results.

These three steps will greatly improve the accuracy of your rifle. These are typically performed by a qualified gunsmith that is familiar with truing your manufacturer’s rifle.

Once the receiver is complete, we can move onto the actions bolt.

1. True bolt face

The bolt face is the part of the bolt that comes in direct contact with the base of the brass rifle case. With the bolt setup in the lathe and running perfectly true the face of the bolt will be re-cut. This again reduces any inconsistencies that the bolt might have when it comes into contact with the rifle casing.

2. Lapping bolt lugs

In step two of the receiver process the lug seats where re-cut. This process of lapping the lugs on the bolt ensures that each lug makes good contact with the seats when the bolt has been closed. This step should always be done with the trigger installed. Typically, lapping compound is used to remove the high spots on the lug or lugs that are not making good contact.

Having these steps done will greatly improve the accuracy of your rifle. There are other items that can be done to the rifle. It is important to talk with your trusted local gunsmith and have them evaluate the rifle to see what steps they also might recommend.

To talk with 360 Precision about improving the accuracy of your bolt action rifle call 215-399-3598 or email info@360precision.com. We will be happy to discuss the process with you.

The Often Overlooked 6 Creedmoor

All too often I feel that the 6 Creedmoor is overlooked by many shooters. It’s a caliber that checks a lot of the boxes and I often hear people tell me that they want a rifle chambered in a caliber that will work for hunting as well as competitive shooting. So why not the 6 Creedmoor then? Here are 3 reasons I believe that the 6 Creedmoor makes for a good round.

  • It’s a good hunting round. So many people wan to believe that bigger is better. That is many times not the case. A 6mm or .243-inch bullet is a perfect round for varmint hunting and white tail deer. Also shooting a 6mm round produces less felt recoil than the larger caliber bullets. Less recoil allows a person to shoot or perform better behind the gun. You are less likely to flinch, and it is much easier to stay on glass and see the shot in case you need to make a follow up. So, for many types of hunting the 6mm bullet is a very good choice.
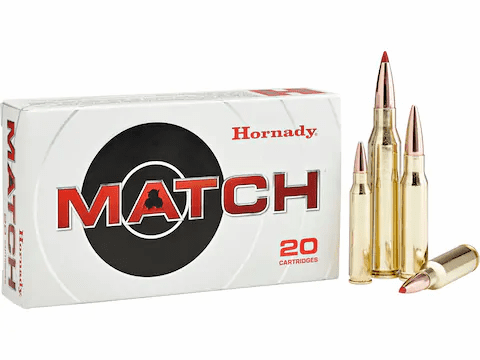
  • Over the counter ammo. Hornady, Nosler and Berger all make 6mm Creedmoor ammo. This makes shooting the 6 Creedmoor round even easier since you don’t have to reload. For many of us reloading is a way of life to obtain the absolute best accuracy out of a rifle, but there are a lot of people that either don’t have the time, budget, knowledge, or simply don’t need ¼ MOA accuracy for their rifle. In these cases, a shooter can go to a local gun shop or purchase 6mm Creedmoor ammunition online. Making this round an easy one to get started with.
  • Easily works for competitive shooting. I’m asked by a lot by shooters looking to get into the competitive world what caliber they should go with. Obviously, that’s a very loaded question (pun intended), but I find that the 6 Creedmoor many times is a good solution. Here’s why:
  • It still works as a hunting round (allows the rifle to have multiple uses)
  • Produces less recoil that the more common 6.5 Creedmoor (which is still a good round but is more difficult in to manage in the competitive world).
  • Lower entry cost since you don’t have to reload and can still find match grade ammo that is readily available.

So, if you’re just looking to get into shooting, whether its for hunting or competition make sure you take a hard look at the 6mm Creedmoor. Even if you’re an experienced shooter you may have easily discounted the round for one reason or another. Maybe it’s time to give it another look.

If you have questions or are looking to build a custom precision rifle give us a call and we would be happy to discuss all your options.You can reach 360 Precision at 215-399-3598 or send us an email at: info@360precision.com.