Why do your shots keep drifting? Why can’t you see your impacts? The answer isn’t your trigger pull, your optic, or your ammunition, it’s how you position your body behind the rifle.
The Fundamental Everyone Overlooks
We see it constantly at 360 Precision. Shooters come in, some brand new, others with years of experience, even highly trained military and SWAT operators, and they all make the same critical mistake with their body positioning, as SWAT sniper Jordan Glassman reveals in his interview about common fundamental errors. In fact, improper body positioning is one of the biggest mistakes new shooters make, according to our precision rifle expert Joe Gentile.
They’re fighting their rifle instead of working with it.
The result? Shots drift unpredictably. They can’t spot their impacts. Their groups refuse to tighten up, no matter how much they practice. They blame their equipment, their ammunition, even their eyesight.
But the real problem is simpler than they think: they’re not squared up behind their rifle.
Today, we’re breaking down the single most important body position rule in precision rifle shooting. This fundamental affects everything, your accuracy, your ability to manage recoil, your speed in competition, and most critically, your ability to see where your rounds actually go.
Fix this one thing, and you’ll transform your shooting overnight.
The Mistake: Why Most Shooters Position Themselves Wrong
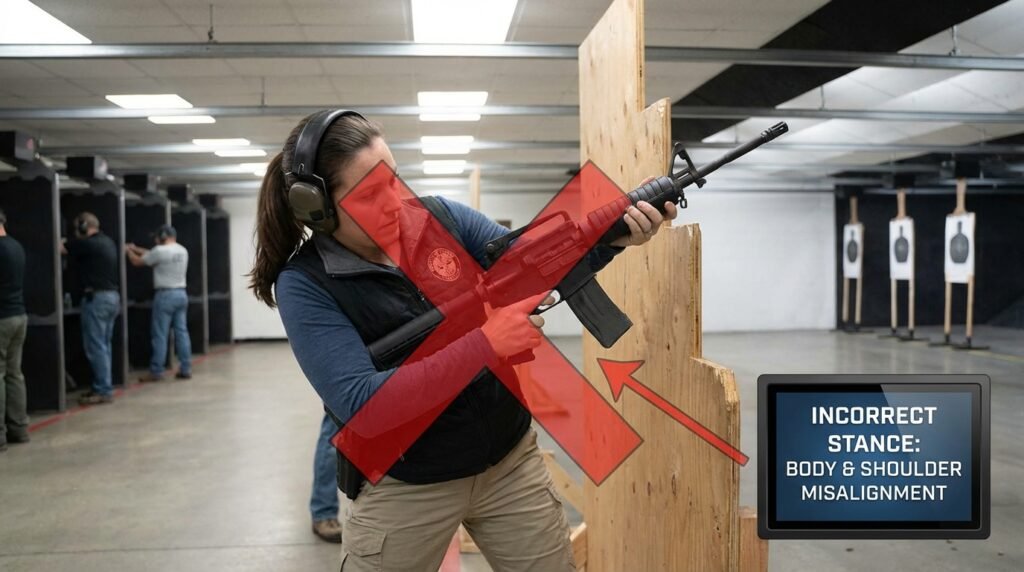
The Canted Stance Problem
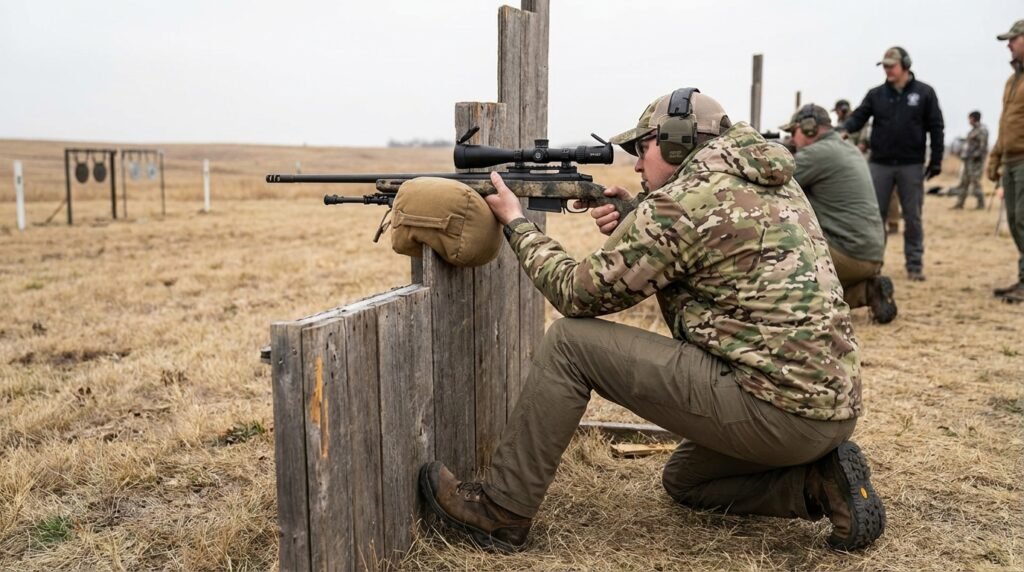
When most people pick up an AR-platform rifle or any semi-auto, they naturally adopt what we call a “canted” or “bladed” stance. Their bodies angle to the side, shoulders tilted, torsos twisted away from the rifle’s centerline.
Where does this come from?
This stance originates from close-quarter engagement training and tactical shooting disciplines. It’s designed for:
- Rapid target transitions
- Presenting a smaller profile to threats
- Quick mobility and footwork
- Self-defense scenarios at close range
Here’s the problem: What works brilliantly at 7 yards in a defensive shooting situation becomes a liability at 300, 500, or 1,000 yards when precision matters.
What Happens When You Shoot Canted
When your body is angled off to the side, and you fire your rifle, physics takes over:
- Recoil doesn’t go straight back, it kicks diagonally because your body isn’t aligned with the rifle’s bore axis
- The rifle pivots off your shoulder instead of driving straight into it
- You lose sight of the picture immediately as the rifle torques away from your eye
- You can’t spot your shot, the most critical feedback mechanism in precision shooting
- Follow-up shots are slower because you have to reacquire your target from scratch
- You’re fighting the rifle with muscle tension instead of using skeletal support
Even if you make a perfect trigger press with ideal ammunition and great optics, this positional mistake will undermine everything.
The Hard-on-Hard Contact Issue
There’s another common mistake we see: shooters placing their rifle directly on whatever surface they’re shooting from, a barricade, a vehicle hood, a concrete wall.
Why is this bad?
- Hard contact amplifies vibrations and movement
- The rifle bounces and skips instead of settling
- Tiny movements get magnified downrange
- It’s much harder to maintain a stable sight picture
- You lose the ability to make fine adjustments
We’ll show you the “soft contact” solution in just a minute.
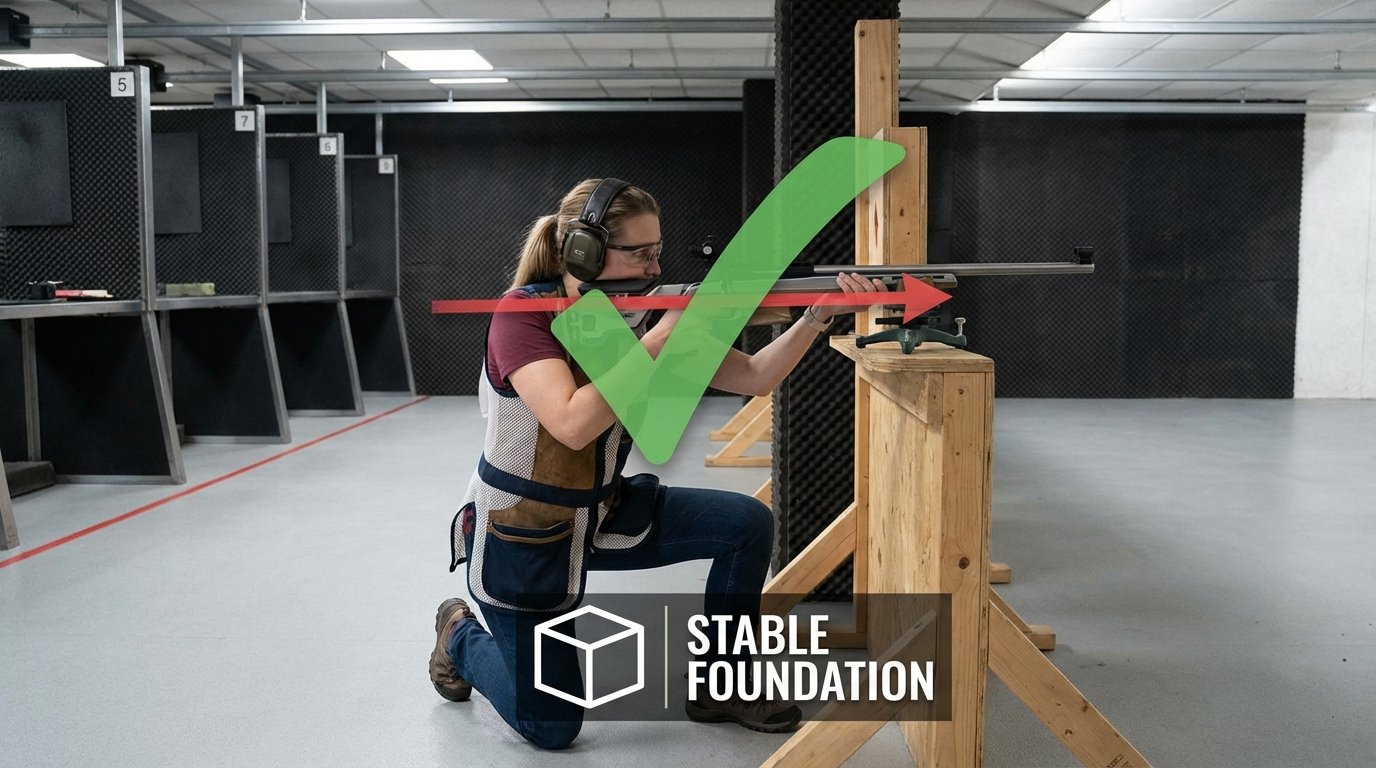
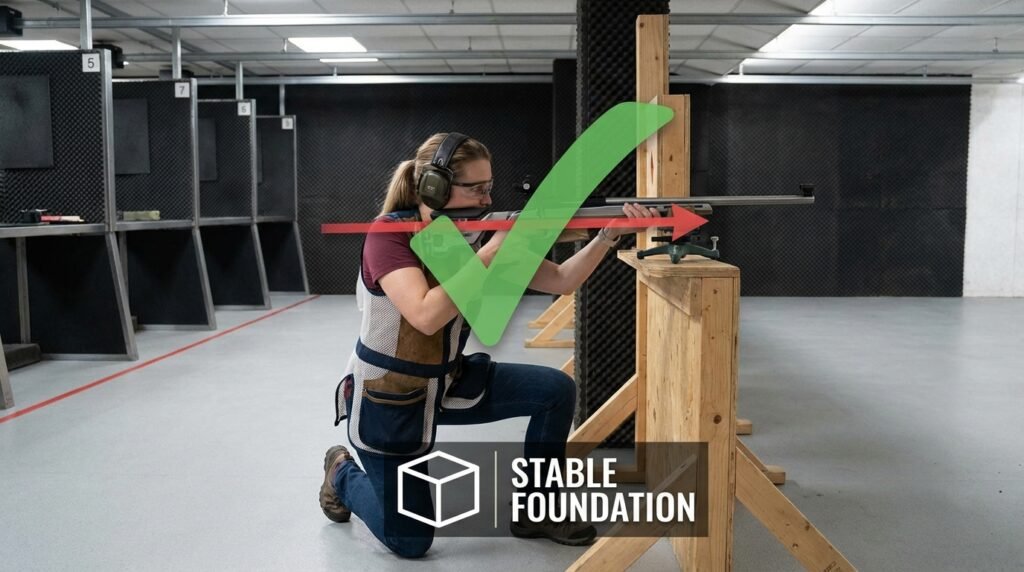
The Solution: Squaring Up Behind Your Rifle
What Does “Squared Up” Mean?
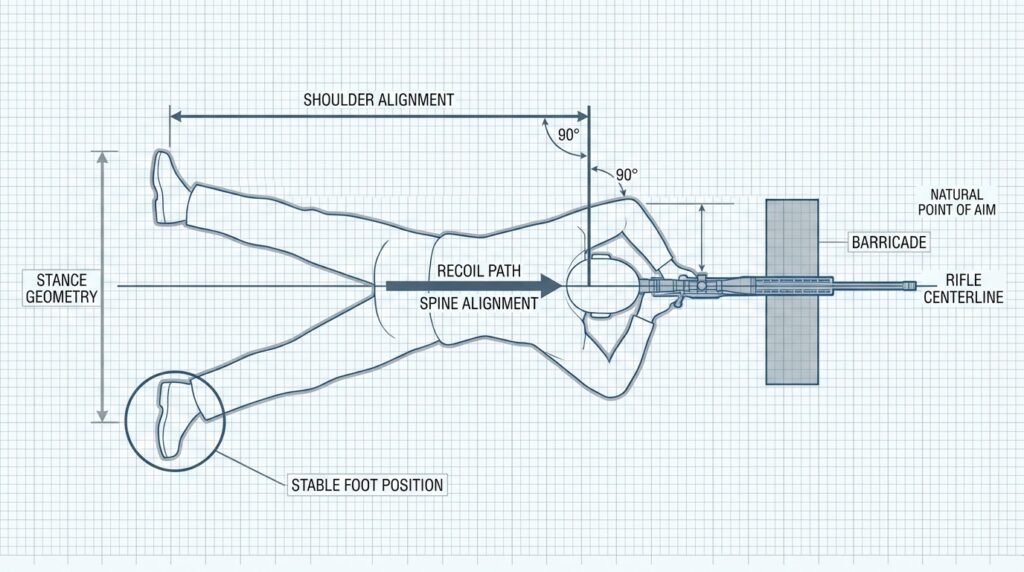
Squaring up means aligning your body so that:
✅ Your shoulders are perpendicular to the rifle (not angled) ✅ Your spine is in line with the bore axis (straight behind the gun) ✅ Recoil travels straight back into your body (not diagonal) ✅ You’re coming down “over the top” of the rifle (not approaching from the side) ✅ Your belt buckle points at your target (a simple reference point)
Think of your body as a stable platform that the rifle recoils straight back into, rather than a twisted frame that the rifle kicks away from.
The Biomechanics: Why This Works
When you square up properly:
Recoil management becomes effortless because the rifle’s energy travels straight back through your skeletal structure into your hips and down into the ground. You’re not muscling the gun, you’re letting bone-on-bone support do the work.
You maintain sight picture through recoil because the rifle stays aligned with your eye. The scope may lift slightly, but it comes right back down on target instead of kicking off to the side.
You can spot every shot, which means you see exactly where your round impacted (or missed). This feedback lets you make intelligent corrections rather than guessing.
Follow-up shots are faster because you never lose your target, you’re already there when the rifle settles.
You can relax because you’re not fighting the gun. A relaxed shooter is a consistent shooter.
Step-by-Step: How to Square Up Properly
Let’s walk through the exact technique, step by step, just like we demonstrate at 360 Precision.
Step 1: Identify Your Target
Before you even touch your rifle, look downrange and identify:
- Your primary target
- A reference marker near it (a distinctive tree, a patch of different-colored grass, a target marker, anything visible)
This reference marker becomes critical for fast target acquisition (we’ll explain why later).
Step 2: Position Your Shooting Bag First
Don’t rush this. Many shooters skip proper bag placement and wonder why their position feels unstable.
If using a shooting bag (highly recommended):
- Place the bag on the barricade or surface FIRST
- Let it settle and conform to the surface
- Position it so your rifle will end up pointing at your target
Popular bags:
- Armageddon Gear (various sizes, the “Pint” size is compact and light)
- Tab Gear
- Wiebad
- Gamechanger (larger, more versatile)
The “Soft Contact” Principle:
Your shooting bag creates a buffer between the hard surface and your rifle. A quality shooting bag is essential competition gear, learn more about what competitive shooters pack in their ruck sacks for matches.
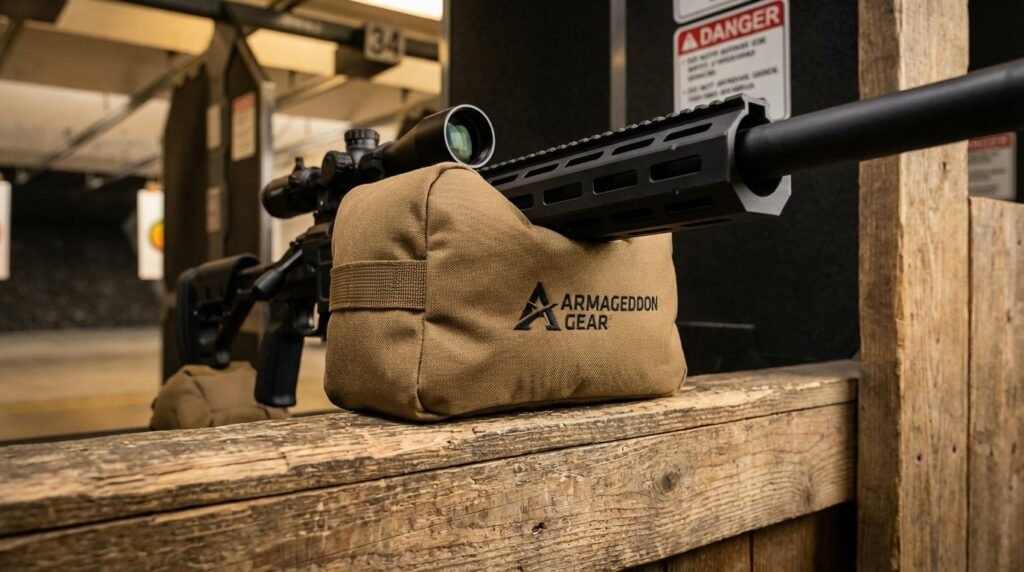
A quality shooting bag helps with these:
- Dampens vibrations
- Provides a stable, grippy surface
- Allows micro-adjustments
- Prevents bouncing and skipping
- Dramatically improves consistency
Step 3: Position Your Rifle on the Bag
Once your bag is set:
- Place your rifle on the bag
- Slide it forward until it’s just ahead of the magazine
- This puts the rifle at its natural balance point
- You’re not supporting all the weight at the rear
- The bag does the work, you just stabilize
Pro tip: If shooting on a prop with side support (like a wall with edges), position yourself to one side rather than dead center. This gives you a reference point, you can press your support thumb against the edge for added stability.
Step 4: Position Your Body
Now comes the critical part: your body position.
Feet and stance:
- Spread your legs to create a stable base
- Your stance should feel comfortable and sustainable
- Ask yourself: “Could I hold this position for a full minute without shaking?”
- If you’re already tensing up, adjust your foot position
Square your shoulders:
- Your shoulders should be perpendicular to the rifle
- Imagine a line drawn across your shoulders, it should be at a 90-degree angle to the rifle’s centerline
- Your belt buckle should point straight at the target
Come down over the top:
- Don’t approach the rifle from the side
- Come straight down from above
- Lower yourself directly behind the rifle
- Your head should be centered over the rifle, not off to one side
Step 5: Verify Natural Point of Aim
Here’s the test that reveals whether you’ve done everything correctly:
- Get into your shooting position
- Close your eyes
- Relax completely, let all tension drain from your body
- Take a few breaths
- Open your eyes and look through the scope

What should happen:
If your position is correct, your crosshairs should still be on or very near your target. The rifle hasn’t drifted because your body is naturally aligned with the target.
If your crosshairs have wandered off target, your natural point of aim is wrong. Don’t muscle the rifle back on target, adjust your foot position, and try again until your relaxed position puts you naturally on target.
Step 6: Acquire Your Target Through the Scope
As you’re lowering yourself into position, keep your non-shooting eye open and maintain visual contact with that reference marker you identified earlier.
The process:
- You’re looking at your target/reference marker with your naked eye
- As you lower down
- The rifle is already pointing in approximately the right direction because you positioned the bag correctly
- When you close into the scope, the target should appear immediately in your field of view
Scope magnification matters here:
If your scope is cranked up to 25x, you’ll have a tiny field of view and might not see anything useful when you first look through it.
Recommended: Keep your magnification between 10x and 15x for most shooting. Many competitive shooters stay around 12x for the entire match, which provides enough detail to see impacts while maintaining a usable field of view.
Practical Application: Putting It All Together
Let’s walk through a complete shooting sequence using everything we’ve covered:
Scenario: You’re at a barricade. Your target is a steel plate at 400 yards.
The Complete Sequence:
- Identify downrange: “My target is the center plate. My reference marker is that dead tree branch to the left of it.”
- Bag placement: Pull out your shooting bag, place it on the barricade, and let it settle. Position it so it’s pointing toward your target zone.
- Rifle on bag: Place your rifle on the bag, slide it forward to the balance point (just ahead of the magazine).
- Square your body: Stand behind the rifle, spread your feet for stability, and square your shoulders with the rifle.
- Target reference: Keep your non-shooting eye open, look at that dead tree branch reference marker as you lower down.
- Come down over the top: Lower yourself straight down, centering your head over the rifle.
- Natural point of aim check: As you settle in, the rifle should be pointing close to your target because everything is aligned.
- Acquire target: Look through your scope, the target should appear quickly because you were already looking near it, and your rifle was pre-positioned correctly.
- Final adjustments: Make your fine windage and elevation corrections.
- Relax: Take a breath, relax into the position, and verify you could hold this for 60 seconds if needed.
- Trigger press: Smooth, straight-back press.
- Spot the shot: Because you’re squared up, the rifle recoils straight back, and you maintain sight picture. You see exactly where your round impacts or, if you miss, exactly where it splashes.
- Make intelligent correction: “I hit 0.5 mils left of center, I’ll hold 0.5 mils right for the next target.”
That’s the power of proper positioning. Without it, you’d miss that whole feedback loop.
Why This Matters for Competition Shooting
If you’re shooting in PRS, NRL, or any precision rifle competition, proper positioning isn’t just nice to have, it’s essential for competitive performance.
Time Management
Competitions are run on timers. You have a specific amount of time to engage multiple targets from multiple positions.
With proper positioning:
- You acquire targets in 2-3 seconds instead of 10-15
- You spot every shot and make corrections immediately
- You don’t waste time searching for targets in your scope
- You spend more time shooting and less time setting up
Without proper positioning:
- You fumble around in your scope, looking for the target
- You fire and have no idea where the round went
- You make random corrections that don’t help
- You run out of time before completing the stage
Shot Spotting and Corrections
In long-range shooting, especially at distance, seeing where your shot goes is more valuable than the shot itself.
If you can spot your impacts and misses:
- You know exactly what wind correction to make
- You can adjust for the next target at a different distance
- You build a mental wind map of the range
- You make first-round hits on subsequent targets
If you can’t spot your shots:
- You’re shooting blind
- Every shot is a guess
- You can’t adapt to changing conditions
- You waste ammunition on targets you’ll never hit
Proper body positioning is the foundation of shot spotting.
Follow-Up Speed
Many competition stages require engaging multiple targets rapidly.
With squared-up positioning:
- The rifle returns to your natural point of aim after each shot
- You’re already on or near the next target
- Follow-up shots happen in seconds
With canted positioning:
- The rifle kicks you off target completely
- You have to reacquire from scratch every time
- Follow-ups take 2-3x longer
Common Questions and Troubleshooting
“I’ve been shooting canted for years. Do I really need to change?”
If you’re only shooting at close ranges (under 100 yards) and don’t care about spotting your shots, you can probably get away with it.
But if you want to:
- Shoot accurately at a distance
- Compete successfully
- Make intelligent corrections based on observed impacts
- Shoot faster with better follow-ups
…then yes, you need to square up. The good news? It only takes a few range sessions to build the new habit.
“My position feels awkward when I square up.”
That’s normal. Your body is used to the old pattern. Give it time.
Solutions:
- Practice the positioning sequence at home with an unloaded rifle
- Film yourself from multiple angles and review the footage
- Focus on foot position, small adjustments make big differences
- Embrace the awkwardness for 3-4 range sessions until it becomes natural
“What if the barricade or prop forces me into an awkward angle?”
Sometimes, stage design makes perfect positioning impossible. In those cases:
- Get as square as you can within the constraints
- Adjust your foot position to get as perpendicular as possible
- Accept that it won’t be perfect, but make it as good as possible
- Take extra care with your natural point of aim check
Perfect positioning is the ideal. Get as close as you can in real-world situations.
“Do I need an expensive shooting bag?”
No. While premium bags are nice, you can start with:
- A sock filled with rice or sand
- A cheaper bag from Amazon
- A borrowed bag from a friend
Once you understand the principle of soft contact and proper positioning, you can upgrade to better gear later.
“What about prone shooting?”
All the same principles apply:
- Square your body behind the rifle (not angled off to the side)
- Create a straight line from your rifle through your spine
- Use a rear bag or bipod for support with soft contact
- Verify the natural point of aim before shooting
- Relax into the position
The only difference is you’re lying down instead of standing.
Practice Drills to Ingrain Proper Positioning
Drill 1: Dry Fire Positioning Reps
What to do:
- Set up your rifle on a surface at home (unloaded, verified safe)
- Go through the complete positioning sequence 20 times
- Focus on: bag placement, rifle position, squaring shoulders, coming down over the top
- Film yourself from the side and overhead to verify perpendicular alignment
Goal: Build muscle memory so the sequence becomes automatic
Drill 2: The Relaxation Test
What to do:
- Set up your rifle
- Close your eyes
- Relax completely for 10 seconds
- Open your eyes—are you still on target?
- If not, adjust foot position and repeat
Goal: Develop a true natural point of aim where you’re not fighting the rifle
Drill 3: The Reference Marker Drill
What to do:
- Set up multiple targets at varying distances
- For each target, identify a reference marker near it
- Practice: look at the marker with the naked eye → come down into position → target should appear immediately in scope
Goal: Train fast target acquisition using reference markers
Drill 4: The Spotting Challenge
What to do:
- Shoot 10 rounds at various targets
- Force yourself to verbally call where each shot lands before looking at the target
- “Hit, left edge” or “Miss, 2 inches low”
Goal: Develop the habit of maintaining sight picture through recoil and actually observing impacts
Drill 5: Video Review
What to do:
- Have a friend film you shooting from the side and from behind
- Watch the footage and ask:
- Are my shoulders perpendicular to the rifle?
- Does the rifle recoil straight back or kick to the side?
- Am I maintaining sight picture?
- Am I approaching from the side or over the top?
Goal: Identify positioning mistakes you can’t feel while shooting
The Bottom Line: One Rule That Changes Everything
Squaring up behind your rifle isn’t just another tip or trick, it’s a fundamental principle that affects every aspect of your shooting:
✅ Better recoil management – Rifle recoils straight back instead of kicking sideways
✅ Improved accuracy – Consistent body position = consistent point of impact
✅ Faster target acquisition – Natural point of aim puts you on target immediately
✅ Shot spotting ability – You actually see where your rounds go
✅ Intelligent corrections – Observed impacts let you make smart adjustments
✅ Increased confidence – Repeatable process you can trust under pressure
✅ Less fatigue – Relaxed, sustainable positions instead of muscling the rifle
✅ Competition success – Speed and accuracy improvements translate directly to better scores
The best part? This costs you absolutely nothing. You don’t need to buy new gear, upgrade your rifle, or take an expensive class. You just need to be aware of this principle and practice it deliberately.
Action Steps: What to Do Right Now
Step 1: Record Yourself
Set up your phone on a tripod or have a friend record you shooting from various positions. Watch the footage and ask:
- Are my shoulders perpendicular to the rifle?
- Am I coming down over the top or approaching from the side?
- Does the rifle kick me off target?
- Am I maintaining sight picture through recoil?
Step 2: Practice Without Ammunition
Before your next range trip:
- Set up your rifle on a barricade or stable surface
- Practice the complete positioning sequence 20 times
- Focus on muscle memory and consistency
- Use the blind eye test to verify the natural point of aim
Step 3: Shoot Slowly and Deliberately
On your next range session:
- Don’t worry about speed yet
- Execute each shot with perfect positioning
- Force yourself to spot every single shot
- Only speed up once the proper position is automatic
Step 4: Seek Feedback
- Have an experienced shooter watch you and provide feedback
- Join a local precision rifle club or match
- Ask questions and be open to correction
- Video yourself regularly to track improvement
Final Thoughts: The Foundation of Marksmanship
We’ve seen it countless times: a frustrated shooter who’s spent thousands on gear, practiced for months, and still can’t figure out why they’re not improving. Then they make this one simple correction to their body position, and suddenly everything clicks.
Their groups tighten up. They start spotting their shots. Their confidence soars. Their competition scores improve dramatically.
All from one fundamental principle: squaring up behind the rifle.
Don’t overlook the basics. Don’t assume you’ve got this figured out because you’ve been shooting for years. Even military-trained operators and experienced competitors make this mistake.
Take the time to consciously practice proper positioning. Drill it until it’s automatic. Your accuracy, your speed, and your overall shooting ability will transform.
Now get out there and square up.
Quick Reference Checklist
Before Every Shot:
- ☐ Target identified with reference marker
- ☐ Bag placed and settled on the barricade first
- ☐ Rifle positioned on bag at balance point
- ☐ Body squared with target (belt buckle pointing downrange)
- ☐ Feet positioned for stability
- ☐ Come straight down over the rifle (not from the side)
- ☐ Shoulders perpendicular to rifle centerline
- ☐ Check relaxed natural point of aim
- ☐ Scope magnification appropriate (10-15x typical)
- ☐ Reference marker visible as you settle into the scope
- ☐ Target acquired quickly
- ☐ Smooth trigger press
- ☐ Stay in scope through recoil
- ☐ Spot impact or miss
- ☐ Make intelligent corrections if needed
Common Cues to Remember:
- “Square your shoulders”
- “Come down over the top”
- “Straight back recoil”
- “Relax into position”
- “Could I hold this for a minute?”