Your rifle used to shoot 0.5 MOA groups. Now it’s struggling to stay under 1.5 MOA, and you can’t figure out why. The answer might be staring you in the face—or more accurately, hiding inside your barrel. At 360 Precision, we cut open a shot-out barrel to show you exactly what’s happening inside, and the visual evidence explains everything.

The Mystery of Disappearing Accuracy
Every precision rifle shooter has experienced this frustrating progression:
Month 1-6: Your new rifle is a laser. Sub-MOA groups all day. You’re confident out to 1,000 yards.
Month 12-18: Groups are opening up slightly. You blame the wind, your technique, maybe the ammunition.
Month 24+: Your rifle that used to stack bullets now prints patterns that look like buckshot. Something has fundamentally changed.
The culprit? Barrel wear.
But what does “barrel wear” actually mean? Most shooters have heard the term, but few understand the specific physical changes happening inside their barrels that destroy accuracy.
Today, we’re going beyond theory. We cut open an actual worn barrel at 360 Precision to show you the exact mechanisms that kill rifle precision. What we found explains why your groups degrade, why velocity becomes inconsistent, and when you’ve reached the point of no return.
If you’ve ever wondered whether your barrel is shot out—or how much life it has left—this article will answer those questions with visual proof you can see with your own eyes.
The Experiment: From Range to Machine Shop
At 360 Precision, we don’t just talk about concepts—we test them. For this demonstration, we took a rifle barrel that was clearly past its prime and put it through two phases:
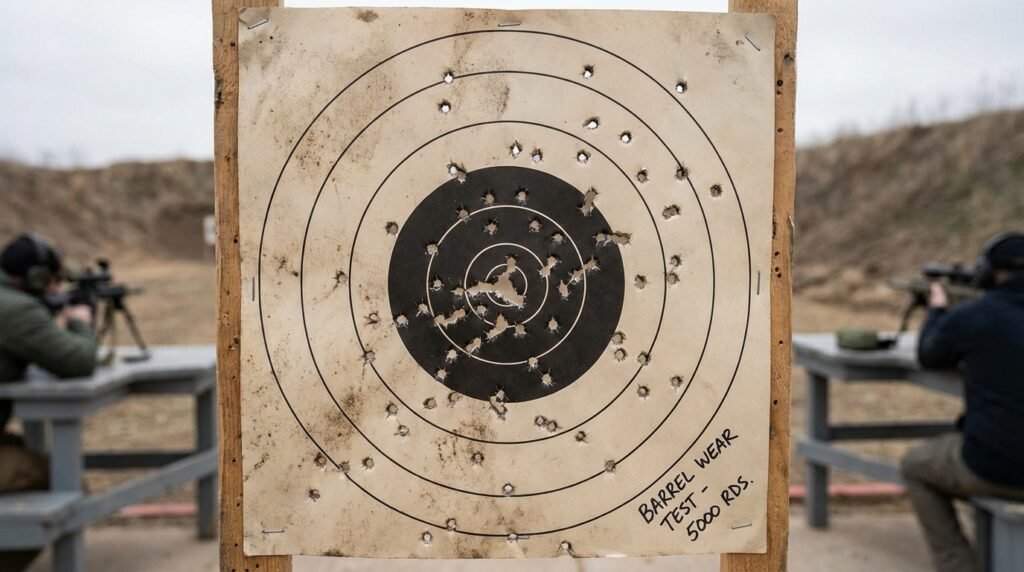
Phase 1: Range Testing
We fired multiple groups with the worn barrel to establish baseline accuracy. The results confirmed what we suspected: groups were significantly degraded compared to what this rifle produced when the barrel was new.
Shots that should have clustered tightly at 100 yards were spreading across the target in ways that couldn’t be explained by wind, shooter error, or ammunition variation alone.
Phase 2: Destructive Analysis
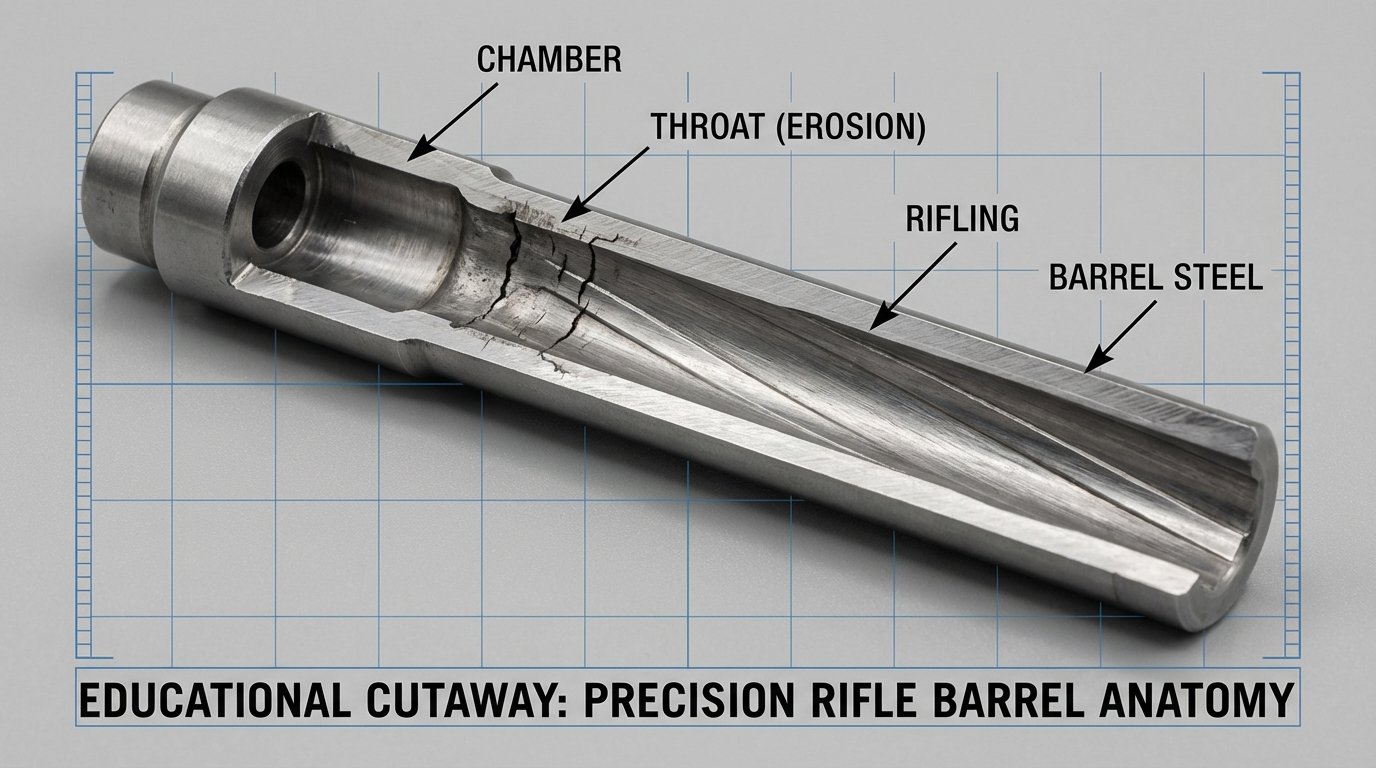
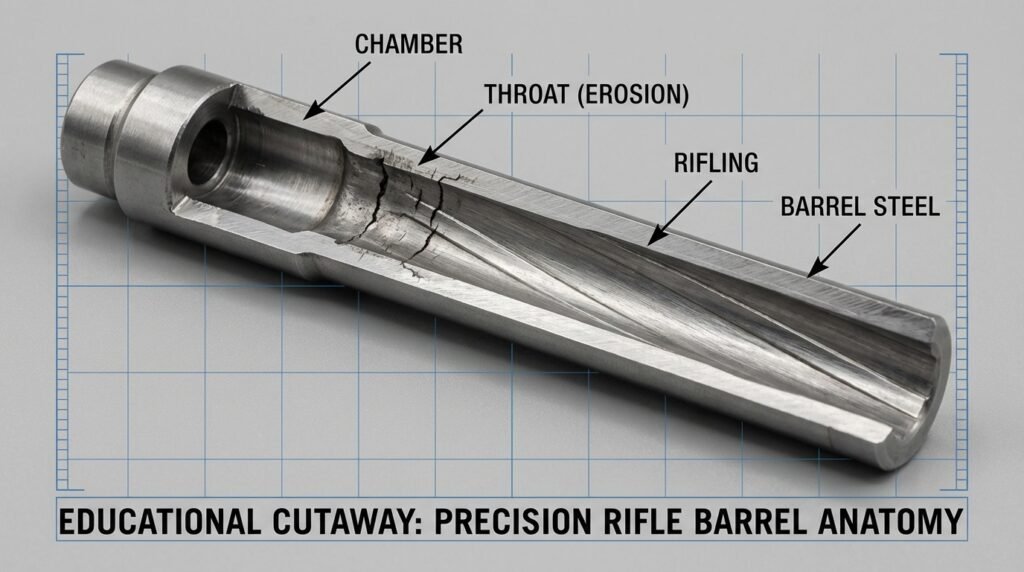
Here’s where it gets interesting. We took that same barrel back to the shop and milled it open lengthwise—cutting through the chamber, throat, freebore, and rifling to expose the internal surfaces.
What we saw confirmed every theory about barrel degradation.
The damage wasn’t subtle. The erosion, fire cracking, and rifling wear were visible to the naked eye, concentrated in predictable areas that directly correlate with accuracy loss.
Let’s break down exactly what we found and why it matters.
Barrel Anatomy 101: Understanding the Critical Zones
Before we can discuss what goes wrong, you need to understand what’s supposed to be there. A rifle barrel isn’t just a tube—it’s a precisely engineered system of specific zones, each with a critical function.
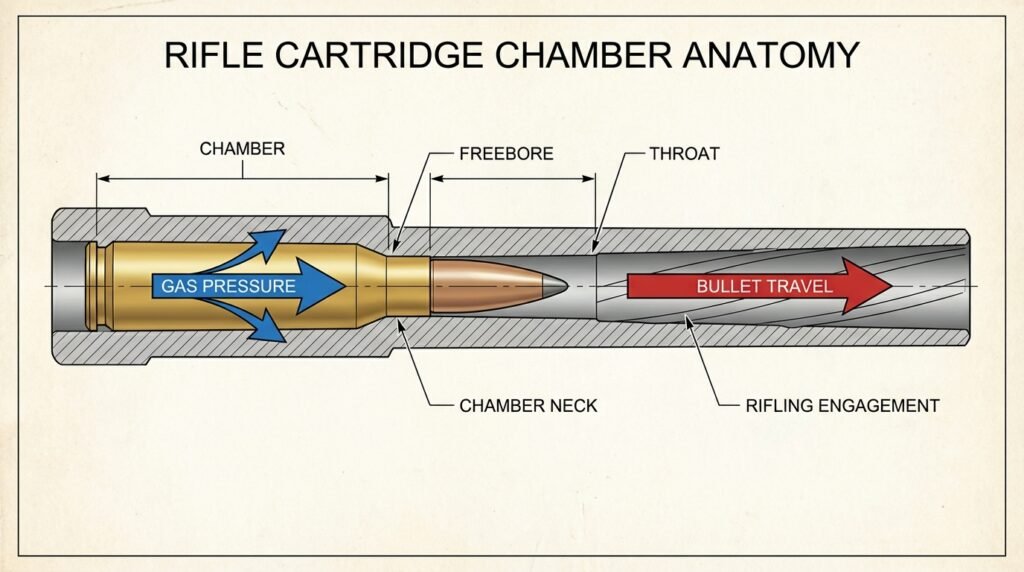
The Chamber
This is where your cartridge sits when loaded into the rifle. The chamber is cut to match the specific dimensions of your caliber, holding the brass case securely while allowing the bullet to project into the next zone.
Function: Contains the pressure from ignition and directs expanding gases forward
The Neck
The narrow section where the bullet case neck transitions to the throat. This is where your bullet is still seated in the brass before it begins its journey down the barrel.
Function: Final positioning before bullet release into the throat
The Throat
This is the critical transition zone immediately after the chamber neck where the bullet first engages the rifling. In our cutaway barrel, this area showed the most dramatic damage.
Function: Guides the bullet from stationary position into high-velocity rotation
Why it’s critical: This is where the bullet experiences the initial engraving from the rifling. Any erosion here creates inconsistent bullet entry, which amplifies errors downrange.
The Freebore
A short, smooth section between the throat and the full rifling. Also called the “leade” or “lead,” this gives the bullet a running start before full rifling engagement.
Function: Allows the bullet to accelerate slightly before full rifling contact, reducing pressure spikes
Why it matters: Erosion in this area changes how and when the bullet encounters the rifling, affecting both pressure and bullet stability.
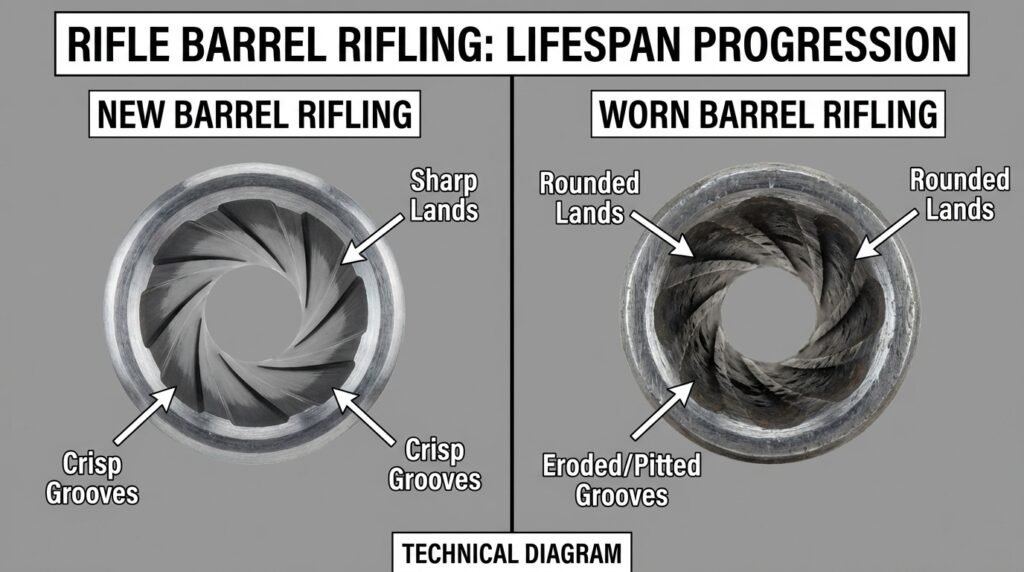
The Rifling
The helical grooves cut into the barrel that impart spin stabilization to the bullet. Lands (the raised sections) and grooves (the cut sections) grip the bullet and force it to rotate.
Function: Stabilize the bullet through gyroscopic spin
Critical measurement: The depth, width, and sharpness of these lands and grooves directly affect how consistently bullets are spun.
When we cut open our test barrel, we could see damage in all these zones—but the throat, freebore, and first few inches of rifling showed the most severe degradation.
For more on rifle accuracy fundamentals, check out our article: Best Steps for Accurizing Your Rifle
What We Saw Inside: The Ugly Truth
When we milled the barrel open, the internal damage was immediately obvious. Here’s what a shot-out barrel actually looks like:
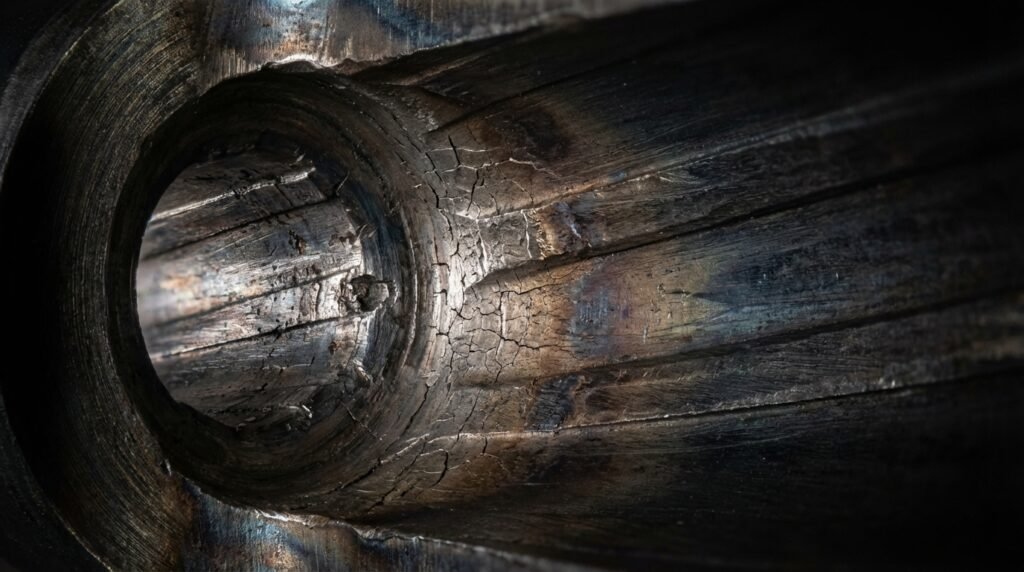
1. Throat Erosion: The Accuracy Killer
The throat area—that critical transition zone right after the chamber neck—showed severe erosion.
What it looks like:
- The sharp, defined edges where the rifling begins were rounded and worn
- The steel surface was pitted and irregular
- The transition from smooth freebore to rifling was no longer crisp
Why this kills accuracy:
When a bullet enters a new barrel, it encounters a clean, sharp transition from the freebore into the rifling. The lands bite into the copper jacket evenly and consistently, imparting uniform spin.
In a worn throat, that transition is eroded and irregular. The bullet doesn’t engage the rifling consistently from shot to shot. Sometimes it enters smoothly, sometimes it encounters more resistance, sometimes it tilts slightly before full engagement.
The result: Inconsistent bullet release, inconsistent spin, inconsistent trajectories. Your groups open up because each bullet is starting its journey slightly differently.
2. Fire Cracking: The Telltale Pattern
Throughout the throat and the first few inches of rifling, we observed extensive fire cracking—a network of tiny cracks in the steel surface that look like a spider web or dried mud.
What causes fire cracking:
Every time you fire a round, the barrel steel experiences:
- Extreme heat (thousands of degrees from burning powder)
- Massive pressure (60,000+ PSI in some calibers)
- Rapid heating and cooling cycles
This repeated thermal stress causes the steel to develop microscopic cracks. Over thousands of rounds, these cracks become visible networks that compromise the barrel’s surface integrity.
Why fire cracking matters:
These cracks create an irregular surface texture that:
- Disrupts smooth gas flow behind the bullet
- Creates inconsistent friction and pressure
- Traps copper fouling and carbon deposits
- Accelerates further erosion
Fire cracking doesn’t happen uniformly—it concentrates in the highest-stress areas: the throat and the first few inches of rifling where heat and pressure are most extreme.
3. Rifling Degradation: Loss of Bite
Moving down the barrel from the throat, we saw progressive degradation of the rifling itself.
What worn rifling looks like:
- Lands are rounded instead of sharp-edged
- Groove depth is reduced (rifling is “worn down”)
- The clean helical pattern becomes irregular and shallow
Why rifling wear destroys precision:
Rifling works by gripping the bullet jacket and forcing rotation. When lands are sharp and deep, they cut clean, consistent grooves into the copper.
When rifling is worn:
- The bullet may slip slightly instead of gripping firmly
- Spin rate becomes inconsistent
- Jacket engraving varies from shot to shot
- Bullets exit with different stabilization characteristics
The first 2-4 inches of rifling are critical. This is where initial spin is imparted. If this section is compromised, the damage is done before the bullet even reaches the mid-barrel.
4. Carbon and Copper Fouling in Damaged Areas
Our cutaway showed significant carbon buildup and copper fouling concentrated in the eroded sections.
Why fouling accumulates in worn areas:
- Rough surfaces from fire cracking trap deposits
- Erosion creates pockets and irregularities where copper embeds
- Damaged rifling doesn’t clean as effectively
The fouling feedback loop:
- Barrel develops erosion and fire cracking
- Rough surfaces trap copper and carbon
- Fouling further roughens the surface
- Cleaning becomes less effective
- Additional fouling accelerates wear
This is why a worn barrel that used to go 100 rounds between cleanings now fouls out after 20.
The Physics of Failure: How Wear Kills Accuracy
Understanding what the damage looks like is one thing. Understanding how that damage translates to poor accuracy is another.
Inconsistent Pressure Development
In a new barrel with crisp rifling and a clean throat, pressure develops consistently from shot to shot. The bullet enters the rifling at the same point, encounters the same resistance, and experiences predictable pressure curves.
In a worn barrel:
- Erosion in the throat changes the volume of the freebore area
- Bullets may jump a variable distance before engaging rifling
- Pressure peaks vary shot-to-shot
- Velocity becomes inconsistent
Result: Your chronograph shows increasing extreme spread (ES) and standard deviation (SD). Some shots are fast, some are slow, and that translates directly to vertical stringing on target.
Inconsistent Bullet Release
The moment a bullet leaves the case and enters the rifling is critical. In a worn throat, this moment varies:
- Sometimes the bullet encounters sharp rifling remnants and gets a good bite
- Sometimes it encounters eroded areas and slips slightly
- Sometimes it tilts microscopically as it enters damaged rifling
Result: Bullets exit the muzzle with slightly different orientations. Even a few thousandths of a degree of variation at the muzzle becomes inches at 100 yards and feet at 1,000 yards.
Degraded Spin Stabilization
Rifling twist rate is measured in inches per revolution (e.g., 1:8″ twist). But that assumes the rifling is actually gripping the bullet consistently.
Worn rifling with rounded lands doesn’t bite as deep. The bullet may:
- Slip partially instead of rotating at the designed rate
- Experience variable spin depending on which section of worn rifling it encounters
- Exit with inconsistent gyroscopic stability
Result: Some bullets are overstabilized, some are understabilized, and groups open up both horizontally and vertically.
Barrel Harmonics Change
As erosion progresses, the barrel’s internal geometry changes. This affects barrel harmonics—the vibrations that occur as the bullet travels down the bore.
A load that was perfectly tuned to your barrel’s harmonics when new may now be completely out of sync with the worn barrel’s vibration pattern.
Result: Even if you’re using the exact same ammunition that used to shoot 0.3 MOA, you’re now getting 1.5 MOA because the timing of bullet exit versus barrel whip has changed.
The Progression: How Barrels Die
Barrel wear doesn’t happen overnight. It’s a gradual progression that accelerates as damage compounds.
Stage 1: Break-In (0-100 Rounds)
New barrels often improve during the first 50-100 rounds as microscopic tooling marks smooth out. Groups actually tighten during this phase.
What’s happening:
- Surface roughness from manufacturing smooths out
- Barrel “settles” into consistent dimensions
- Copper fouling stabilizes
Stage 2: Prime Performance (100-1,500 Rounds)
This is your barrel’s golden age. Accuracy is at its peak, fouling is manageable, and consistency is excellent.
What’s happening:
- Barrel surfaces are smooth and stable
- Rifling is sharp and bites consistently
- No significant erosion yet
How long this lasts depends on:
- Caliber (smaller, overbore cartridges wear faster)
- Powder type (some burn hotter than others)
- Firing schedule (rapid-fire heats barrels more)
- Barrel quality (better steel lasts longer)
Stage 3: Early Degradation (1,500-3,000 Rounds)
You might start noticing subtle changes:
- Groups occasionally open up
- Velocity spreads increase slightly
- Fouling accumulates faster
What’s happening:
- Throat erosion begins
- Initial fire cracking develops
- Rifling starts losing edge sharpness
Can you still compete/hunt with this barrel? Absolutely. Most shooters won’t notice the difference yet.
Stage 4: Noticeable Decline (3,000-5,000 Rounds)
Accuracy degradation becomes obvious:
- Groups that were 0.5 MOA are now 0.8-1.0 MOA
- Vertical stringing appears
- Cleaning is more frequent and less effective
What’s happening:
- Significant throat erosion
- Extensive fire cracking in first few inches
- Rifling wear measurable with bore scope
Can you still use this barrel? Yes, but competitive shooters will start thinking about replacement.
Stage 5: Shot Out (5,000+ Rounds)
The barrel is past its useful life for precision work:
- Groups are 1.5 MOA or worse
- Velocity is highly inconsistent
- Frequent fliers and unexplained misses
- Copper fouling after just a few rounds
What’s happening:
- Severe throat erosion (often visible from the chamber end)
- Rifling worn smooth in critical first inches
- Fire cracking throughout the bore
What now? Time for a rebarrel. The rifle can still function, but precision is gone.
Important note: These round counts are approximate and vary wildly based on cartridge. A .223 Rem might last 10,000+ rounds. A 6.5-284 or 28 Nosler might be done at 1,200 rounds.
Learn more about maintaining peak performance: Accurizing Your Rifle for Better Precision
Why the Throat Dies First: The Science of Erosion
In our cutaway barrel, the damage wasn’t evenly distributed. The throat and first few inches of rifling were devastated, while the mid-barrel and muzzle sections showed minimal wear.
Why does the throat take the worst beating?
1. Maximum Pressure and Temperature
When the primer ignites the powder, pressure and temperature peak in the chamber and throat area before the bullet moves significantly.
Peak conditions:
- Temperatures: 3,000-5,000°F
- Pressure: 50,000-70,000 PSI (depending on cartridge)
- Duration: Milliseconds, but repeated thousands of times
The steel in the throat is exposed to extremes that the rest of the barrel never experiences.
2. Powder Particles as Sandblast
Burning powder creates high-velocity particles that blast against the throat. It’s essentially sandblasting the steel at microscopic scale, thousands of times over.
The effect:
- Erosion of steel surface
- Pitting and roughening
- Accelerated fire cracking
3. Rifling Engagement Trauma
The bullet transitions from stationary to 2,500+ feet per second in fractions of an inch. The initial engraving as it enters the rifling creates tremendous force on those first few threads of rifling.
The result:
- Rifling at the throat wears faster than anywhere else
- Lands round off and lose definition
- Grooves become shallow
4. Gas Cutting and Jetting
As the bullet engages the rifling, high-pressure gases can jet past imperfections, cutting channels in the steel.
Gas cutting:
- Creates irregular erosion patterns
- Accelerates throat wear
- Compounds with each subsequent shot
What You Can’t See: Borescope Inspection
The cutaway gives us a dramatic view, but in real-world diagnosis, you use a borescope—a camera that looks down the barrel from the chamber or muzzle.
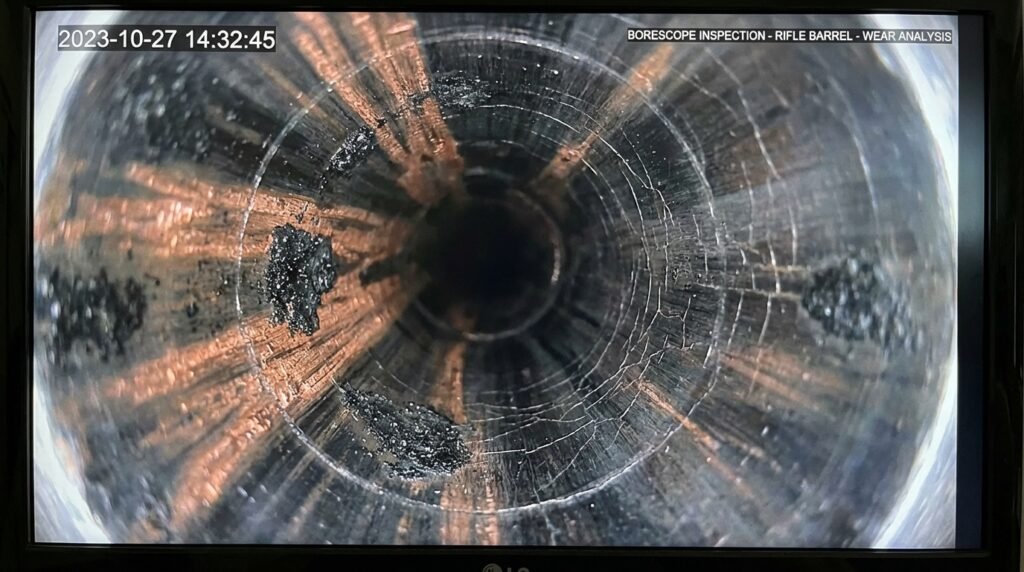
What a Borescope Reveals
In a new barrel:
- Sharp, crisp rifling edges
- Smooth surfaces with minimal tooling marks
- Consistent land and groove depth
- Clean steel with no fire cracking
In a worn barrel:
- Rounded rifling lands
- Visible fire cracking (looks like spider webs or dried mud)
- Erosion at the throat junction
- Copper fouling embedded in rough areas
- Carbon rings near the freebore
How to Read Fire Cracking Severity
Light fire cracking:
- Fine network of cracks
- Still mostly smooth to the touch
- Barrel still shoots well
Moderate fire cracking:
- Deeper, more pronounced cracks
- Rough texture visible
- Accuracy starting to degrade
Severe fire cracking:
- Deep cracks with visible texture
- Extensive network covering throat area
- Accuracy significantly compromised
Learn about proper rifle maintenance: Range Medical and Safety (Note: Replace with actual relevant article link if available)
Factors That Accelerate Barrel Wear
Not all shooting wears barrels equally. Some practices kill barrels fast, while others extend life significantly.
Cartridge Selection: The Biggest Factor
Short barrel life (1,000-2,000 rounds):
- 28 Nosler, 300 RUM, 7mm RUM
- 6.5-284 Norma (when pushed hard)
- Any ultra-magnum cartridge
- Wildcats with extreme overbore ratios
Moderate barrel life (2,000-4,000 rounds):
- 6.5 Creedmoor, 6mm Creedmoor
- .260 Remington, 6.5×47 Lapua
- .308 Winchester (when pushed to max pressures)
Long barrel life (5,000-10,000+ rounds):
- .223 Remington / 5.56 NATO
- .308 Winchester (moderate loads)
- 6mm BR, 6 Dasher
- .22 LR (virtually unlimited for practical purposes)
Why the difference?
It’s all about overbore capacity—the ratio of powder capacity to bore diameter. The more powder you burn in a smaller bore, the hotter and faster the erosion.
Rapid Fire vs. Slow Shooting
Rapid strings:
- Barrel doesn’t cool between shots
- Heat accumulates
- Steel reaches higher sustained temperatures
- Accelerated erosion and fire cracking
Letting the barrel cool:
- Steel doesn’t reach extreme sustained temps
- Less thermal stress
- Significantly extended barrel life
Real-world impact: Competitive shooters who shoot strings of 10-15 rounds in PRS matches will burn barrels faster than hunters who fire 3-shot groups with cooling time between.
Powder Selection
Slower-burning powders:
- Lower peak pressure in throat
- More gradual acceleration
- Less erosion per round
Fast-burning powders:
- Higher peak pressure
- More violent acceleration
- Faster throat erosion
Example: A 6.5 Creedmoor loaded with H4350 will last longer than the same cartridge pushed to max pressure with Varget.
Cleaning Practices
Over-cleaning:
- Aggressive brushing can wear rifling
- Harsh chemicals can damage steel
- Cleaning more than necessary accelerates wear
Under-cleaning:
- Carbon and copper accumulation acts as abrasive
- Fouling accelerates erosion
- Harder to maintain accuracy
The sweet spot: Clean when accuracy degrades or after every 50-100 rounds for precision rifles. Don’t obsess over a spotless bore.
Barrel Quality and Material
Premium barrel steel lasts longer:
- Stainless steel typically outlasts chrome-moly
- Nitrided or coated barrels resist erosion better
- Button-rifled vs. cut-rifled affects durability
Manufacturer quality:
- Premium brands use better steel alloys
- Tighter quality control
- Better heat treating
Reality: A $800 Bartlein or Krieger barrel will last longer than a $200 factory barrel—but all barrels eventually die.
How to Tell If Your Barrel Is Worn Out
You don’t need to cut your barrel open to diagnose wear. Here are the practical indicators:
1. Groups Open Up Consistently
The test: Shoot multiple 5-shot groups with known-good ammunition.
New barrel: Consistent sub-MOA groups Worn barrel: Groups average 1.5 MOA or worse, with frequent fliers
Key word: Consistent. One bad group could be you or the wind. Five bad groups in a row is the barrel.
2. Vertical Stringing
If your groups are tight horizontally but spread vertically, that’s a classic sign of inconsistent velocity from throat erosion.
3. Velocity Inconsistency
Use a chronograph:
- New barrel: ES under 20 fps, SD under 10 fps
- Worn barrel: ES over 40 fps, SD over 15 fps
Increasing velocity spread indicates inconsistent pressure from throat erosion.
4. Rapid Copper Fouling
New barrel: 50-100 rounds between cleanings Worn barrel: Noticeable accuracy loss after 10-20 rounds from copper buildup
Fire cracking and rough surfaces trap copper that won’t clean out easily.
5. Borescope Inspection Shows Fire Cracking
Get a cheap USB borescope ($30-50) and look at your throat.
What to look for:
- Spider-web pattern of cracks
- Rough, pitted surface
- Rounded rifling lands
- Visible erosion at throat junction
If you see moderate to severe fire cracking, you’re in the late stages of barrel life.
6. Loss of “Sweet Spot” Loads
Your pet load that shot 0.3 MOA for 2,000 rounds now barely manages 1 MOA—and no amount of load development gets it back.
This is the barrel telling you it’s changed. The harmonics and internal geometry have shifted beyond what load tuning can compensate for.
Can You Extend Barrel Life?
You can’t stop erosion, but you can slow it down.
Best Practices for Maximum Barrel Life:
1. Let it cool
- Minimum 30 seconds between shots for precision work
- Ideal: 1-2 minutes if you’re not on the clock
- Touch the barrel—if it’s too hot to hold comfortably, it’s too hot to shoot
2. Use moderate loads
- You don’t always need to push max velocity
- Accuracy nodes often exist at 95% of max pressure
- That extra 50 fps costs you barrel life
3. Clean appropriately
- Don’t over-clean or under-clean
- Use quality solvents and bronze brushes
- Patch until clean, then stop
4. Choose your cartridge wisely
- If barrel life matters, avoid ultra-magnums
- Efficient cartridges like 6mm Creedmoor, 6 Dasher, .308 Win last longer
- Smaller bores burn faster—that’s physics
5. Protect the throat
- Avoid firing immediately after chambering (let pressure equalize)
- Use quality brass with consistent neck tension
- Proper seating depth reduces throat stress
6. Consider barrel treatments
- Nitriding or coatings (Cerakote, Melonite) can extend life
- Not a miracle cure, but measurable improvement
When to Rebarrel: The Decision Point
For competitive shooters: Rebarrel when groups exceed your competitive standard. If you need 0.5 MOA to win and your barrel is averaging 0.8 MOA, it’s time—even if it’s “good enough” for casual shooting.
For hunters: Rebarrel when your rifle won’t hold the accuracy you need at your maximum hunting range. A 1.5 MOA rifle is fine for deer at 200 yards, but not for elk at 600.
For precision enthusiasts: Rebarrel when the rifle stops being enjoyable. If you’re fighting the equipment instead of perfecting your technique, the barrel has outlived its usefulness to you.
Cost vs. benefit:
- Quality barrel: $300-800
- Gunsmith install: $200-400
- Total investment: $500-1,200
If you’ve shot 3,000-5,000 rounds through your current barrel, you’ve gotten your money’s worth. A fresh barrel brings back that “new rifle” feeling and restores confidence.
Considering a rebarrel? Read: Best Steps for Accurizing Your Rifle
The Point of No Return: What Our Cutaway Taught Us
Our cutaway barrel demonstrated something crucial: barrel wear is not linear.
The Cliff Effect
For most of a barrel’s life, accuracy stays relatively stable. You go from:
- 0.3 MOA (new)
- to 0.4 MOA (1,500 rounds)
- to 0.5 MOA (2,500 rounds)
- to 0.6 MOA (3,500 rounds)
Then suddenly:
- 1.2 MOA (4,000 rounds)
- 1.8 MOA (4,500 rounds)
The degradation accelerates. Once fire cracking and erosion reach critical levels, the barrel deteriorates rapidly.
Why the Cliff Happens
Compounding damage:
- Initial erosion creates rough surface
- Rough surface traps copper and carbon
- Fouling accelerates erosion
- Fire cracking deepens
- Rifling wears faster
- Everything compounds exponentially
The practical lesson: When your barrel starts showing signs, you don’t have as much time left as you think.
Conclusion: What We Learned from Cutting Open a Barrel
Barrel wear isn’t a mystery. It’s predictable physics.
The key insights:
- The throat dies first because it endures the most extreme conditions—temperature, pressure, and mechanical stress all peak in this critical zone.
- Fire cracking is inevitable from repeated thermal cycling. The steel can only handle so many heat-and-cool cycles before it cracks.
- Rifling wears progressively from the throat forward. The first few inches are everything—if they’re compromised, accuracy is gone.
- Fouling accelerates wear by creating abrasive buildup that compounds erosion with every shot.
- Accuracy doesn’t degrade linearly—it stays relatively stable until critical erosion is reached, then falls off a cliff.
- Every barrel has a lifespan determined by cartridge choice, firing schedule, and maintenance. You can extend it, but you can’t avoid it.
Cutting open that worn barrel gave us visual confirmation of what precision shooters have known for decades: barrels are consumables, just like tires on a car. They wear out. They need replacement.
The difference is knowing when.
If your groups are opening up, your velocity is inconsistent, and your bore scope shows fire cracking in the throat—you’re not imagining it. Your barrel is telling you it’s tired.
Listen to it.
Take Action: Evaluate Your Barrel Today
Don’t wait for accuracy to completely disappear. Take 30 minutes this week to:
1. Shoot a diagnostic group
- 5 shots at 100 yards with your best ammunition
- Calm conditions, proper fundamentals
- Measure the group honestly
2. Run it through a chronograph
- Record 10-shot velocity data
- Calculate ES and SD
- Compare to your baseline when the barrel was new
3. Inspect with a borescope
- $30-50 USB borescope from Amazon works fine
- Look at the throat and first few inches of rifling
- Check for fire cracking, erosion, copper fouling
4. Make the call
- If groups, velocity, and borescope all look good: keep shooting
- If you’re seeing degradation: start planning your rebarrel
- If it’s shot out: don’t waste expensive ammunition—order that new barrel
Connect with 360 Precision
Have questions about barrel life, rebarreling, or accurizing your rifle? The team at 360 Precision has decades of combined experience in precision rifle building and maintenance.
Follow us: Instagram @360precision1
Related Articles
Continue your precision rifle education: